Uniden BC250D English Owners Manual - Page 20
Understanding the Menu System - parts
 |
View all Uniden BC250D manuals
Add to My Manuals
Save this manual to your list of manuals |
Page 20 highlights
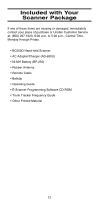
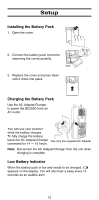
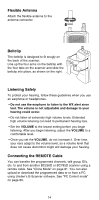
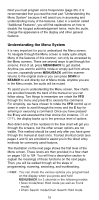
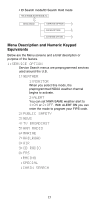
Next you must program some frequencies (page 26). It is recommended that you read the next part "Understanding the Menu System" because it will assist you in accessing and understanding many of the features. Later in a section called "Additional Features", you will find explanations on how to disable the keypad acknowledgement tones, mute the audio, change the appearance of the display and other general features. Understanding the Menu System It is very important for you to understand the Menu screen. To navigate through the Menu screen is really quite simple. Many of the features of this scanner, can only be accessed by the Menu screens. There are several ways to get through the screens. First of all, press MENU/BACK to get started. Anytime you want to exit this mode or simply quit from where you are, repeatedly press MENU/BACK until the scanner returns to the original state or you can press SCAN or SEARCH to exit directly out of Menu mode. Anytime you are in the Menu mode, the audio will be muted. To assist you in understanding the Menu screen, flow charts are provided towards the back of the manual so you can follow along. Two things to remember are rotate the VFO through the menu and press E to execute the command. For simplicity, we have chosen to rotate the VFO control up or down in order to scroll through the menu and the E key for entering or executing a command. Once you have pressed the E key and executed the final choice (for instance, ON or OFF), the display backs up to the previous level of options. Also direct entry of the numbers in the flow chart will get you through the screens, but the other screen options are not visible. This method should be used only after you have gone through the manual at least once. Tearout shortcut cards (see pages 4 and 5) are provided to assist you in the direct entry methods for commonly used features. The illustration on the next page shows the first level of the Menu screen. These levels are then provided in a flow chart on pages 102 to 104. You will find a description section to explain the meanings of these functions on the next pages. Then, you will be walked through all the steps of programming, scanning, searching, and trunktracking. Hint: You can check the various options you programmed on the display when you press and hold MENU/BACK for 2 seconds in the following modes. • Scan mode/Scan Hold mode (as well as Trunk mode). • Chain Search mode/Chain Search Hold mode 16
-
 1
1 -
2
-
3
-
4
-
5
-
6
-
7
-
8
-
9
-
10
-
11
-
12
-
13
-
14
-
 15
15 -
 16
16 -
 17
17 -
 18
18 -
 19
19 -
 20
20 -
 21
21 -
 22
22 -
 23
23 -
 24
24 -
 25
25 -
26
-
27
-
28
-
29
-
30
-
31
-
32
-
33
-
34
-
35
-
36
-
37
-
38
-
39
-
40
-
41
-
42
-
43
-
44
-
45
-
46
-
47
-
48
-
49
-
50
-
51
-
52
-
53
-
54
-
55
-
56
-
57
-
58
-
59
-
60
-
61
-
62
-
63
-
64
-
65
-
66
-
67
-
68
-
69
-
70
-
71
-
72
-
73
-
74
-
75
-
76
-
77
-
78
-
79
-
80
-
81
-
82
-
83
-
84
-
85
-
86
-
87
-
88
-
89
-
90
-
91
-
92
-
93
-
94
-
95
-
96
-
97
-
98
-
99
-
100
-
101
-
102
-
103
-
104
-
105
-
106
-
107
-
108
-
109
-
110
 |
 |
