Uniden UM415 English Owners Manual - Page 32
Installing The Hardware - antenna
 |
UPC - 050633501290
View all Uniden UM415 manuals
Add to My Manuals
Save this manual to your list of manuals |
Page 32 highlights
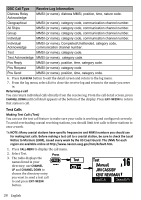
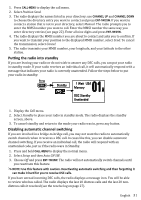
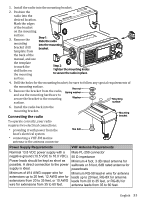
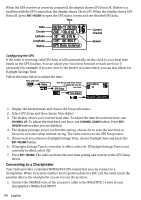
Renaming Channels If you discover that a marine radio channel has a different common name in your local area, you can change the name of that channel to make it easier for you to use (see the channel lists beginning on page 40 for the default channel names). To rename a channel, follow the steps below: 1. Display the normal menu and choose the Setup sub-menu. 2. Select Channel Name. The screen displays the list of channels. 3. Use CHANNEL UP and CHANNEL DOWN to choose the channel you want to change and press ENT-1W/25W. 4. Select Rename to enter a new name for this channel. The radio prompts you to enter a new name for this channel. Each name can be up to 12 characters. Use CHANNEL UP and CHANNEL DOWN to change the first character. 5. When the first character is correct, press ENT-1W/25W. The cursor moves to the next character. Enter the remaining 11 characters of the name. If the name is shorter than 12 characters, press and hold ENT-1W/25W to complete the name entry. If you make a mistake while entering a number, press CLR-SCAN to erase the wrong number and the cursor is moved to the left digit. 6. When you finish entering the name, the radio displays the new channel name and asks you to confirm. To save this new channel name, select Yes; to cancel the change, select No. The radio returns to the channel list. 7. To restore a channel back to its original name, select the channel and choose Default. 8. When you are satisfied with the channel list, select Exit to close the menu screen. Installing the Hardware Mounting the radio Your radio can sit at any angle in the mounting bracket so it can easily accommodate the best location. First, determine the best place to mount the radio. For optimum performance, find a location that can: Properly support the weight of the radio, approximately 2.2 pounds or 1.1 kilograms. You may need to use some type of anchor with the mounting screws to hold the radio, depending on the surface. Keep the battery leads as short as possible. Keep the antenna lead-in wire as short as possible. Allow free air flow around the heat sink on the rear of the radio. Avoid interference with the ship's compass. 32 English
-
 1
1 -
2
-
3
-
4
-
5
-
6
-
7
-
8
-
9
-
10
-
11
-
12
-
13
-
14
-
15
-
16
-
17
-
18
-
19
-
20
-
21
-
22
-
23
-
24
-
25
-
26
-
 27
27 -
 28
28 -
 29
29 -
 30
30 -
 31
31 -
 32
32 -
 33
33 -
 34
34 -
 35
35 -
 36
36 -
 37
37 -
38
-
39
-
40
-
41
-
42
-
43
-
44
-
45
-
46
-
47
-
48
-
49
-
50
-
51
-
52
-
53
 |
 |