ViewSonic LS820 LS810 User Guide English - Page 51
Light Source Mode
 |
View all ViewSonic LS820 manuals
Add to My Manuals
Save this manual to your list of manuals |
Page 51 highlights
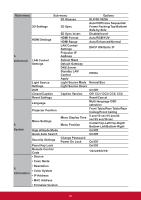
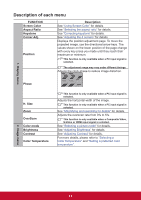
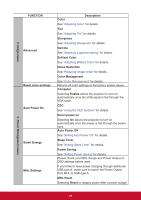
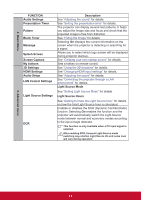
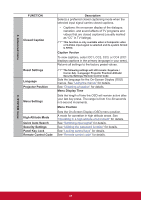
4. Basic Menu FUNCTION Audio Settings Presentation Timer Pattern Blank Timer Message Splash Screen Screen Capture My buttons 3D Settings HDMI Settings Audio Setup LAN Control Settings Light Source Settings DCR Description See "Adjusting the sound" for details. See "Setting the presentation timer" for details. The projector can display several test patterns. It helps you adjust the image size and focus and check that the projected image is free from distortion. See "Hiding the image" for details. Selecting On displays the current information on the screen when the projector is detecting or searching for a signal. Allows you to select which logo screen will be displayed during projector start-up. See "Creating your own startup screen" for details. Sets a hotkey on remote control. See "Using the 3D functions" for details. See "Changing HDMI input settings" for details. See "Adjusting the sound" for details. See "Controlling the projector through a LAN environment" for details. Light Source Mode See "Setting Light Source Mode" for details. Light Source Hours See "Getting to know the Light Source hour" for details on how the total Light Source hour is calculated. Enables or disables the DCR (Dynamic Contrast Ratio) function. Selecting On enables the function and the projector will automatically switch the Light Source mode between normal and economic modes according to the input image detected. This function is only available when a PC input signal is selected. After enabling DCR, frequent Light Source mode switching may shorten Light Source life and noise level will vary during operation. 5. Advanced menu 44
-
 1
1 -
2
-
3
-
4
-
5
-
6
-
7
-
8
-
9
-
10
-
11
-
12
-
13
-
14
-
15
-
16
-
17
-
18
-
19
-
20
-
21
-
22
-
23
-
24
-
25
-
26
-
27
-
28
-
29
-
30
-
31
-
32
-
33
-
34
-
35
-
36
-
37
-
38
-
39
-
40
-
41
-
42
-
43
-
44
-
45
-
 46
46 -
 47
47 -
 48
48 -
 49
49 -
 50
50 -
 51
51 -
 52
52 -
 53
53 -
 54
54 -
 55
55 -
 56
56 -
57
-
58
-
59
-
60
-
61
-
62
-
63
-
64
-
65
-
66
-
67
-
68
-
69
-
70
-
71
-
72
-
73
-
74
-
75
-
76
-
77
-
78
-
79
-
80
-
81
 |
 |