ViewSonic PJD6230 User Guide - Page 17
Installation
 |
UPC - 766907322828
View all ViewSonic PJD6230 manuals
Add to My Manuals
Save this manual to your list of manuals |
Page 17 highlights
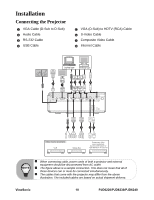
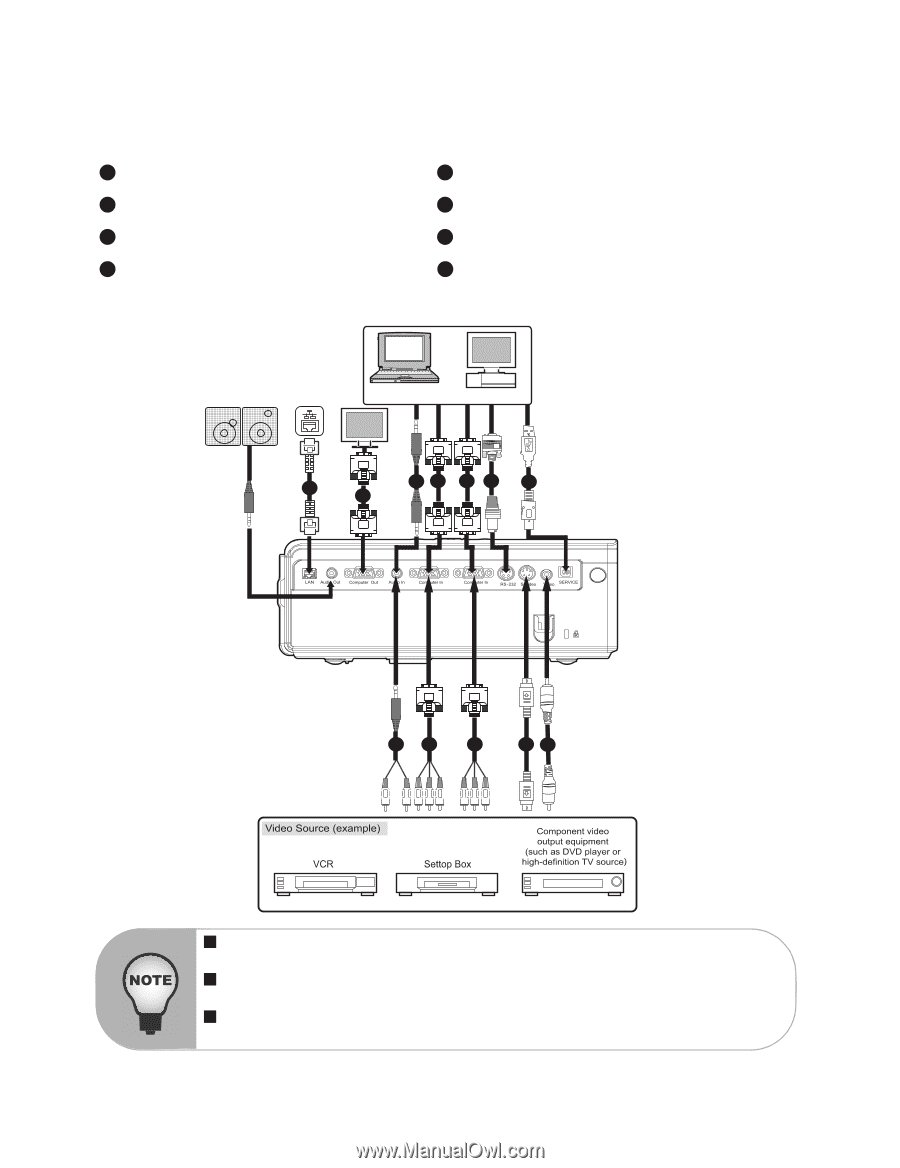
Installation Connecting the Projector 1 VGA Cable (D-Sub to D-Sub) 2 Audio Cable 3 RS-232 Cable 4 USB Cable 5 VGA (D-Sub) to HDTV (RCA) Cable 6 S-Video Cable 7 Composite Video Cable 8 Internet Cable Laptop type Desktop type 8 1 21 1 3 4 25 5 67 „ When connecting cable, power cords of both a projector and external equipment should be disconnected from AC outlet. „ The figure above is a sample connection. This does not mean that all of these devices can or must be connected simultaneously. „ The cables that come with the projector may differ from the above illustration. The included cables are based on actual shipment delivery. ViewSonic 10 PJD6220/PJD6230/PJD6240
-
 1
1 -
2
-
3
-
4
-
5
-
6
-
7
-
8
-
9
-
10
-
11
-
 12
12 -
 13
13 -
 14
14 -
 15
15 -
 16
16 -
 17
17 -
 18
18 -
 19
19 -
 20
20 -
 21
21 -
 22
22 -
23
-
24
-
25
-
26
-
27
-
28
-
29
-
30
-
31
-
32
-
33
-
34
-
35
-
36
-
37
-
38
-
39
-
40
-
41
-
42
-
43
-
44
-
45
-
46
-
47
-
48
-
49
-
50
-
51
-
52
-
53
-
54
 |
 |
ViewSonic
10
PJD6220/PJD6230/PJD6240
Installation
Connecting the Projector
VGA Cable (D-Sub to D-Sub)
VGA (D-Sub) to HDTV (RCA) Cable
Audio Cable
S-Video Cable
RS-232 Cable
Composite Video Cable
USB Cable
Internet Cable
1
5
2
6
3
7
4
8
Desktop type
Laptop type
4
1
1
1
2
7
3
6
5
2
5
8
When connecting cable, power cords of both a projector and external
equipment
should be disconnected from AC outlet.
The figure above is a sample connection. This does not mean that all of
these devices can or must be connected simultaneously.
The cables that come with the projector may differ from the above
illustration. The included cables are based on actual shipment delivery.