Viking DDSF136DSS Installation Instructions - Page 4
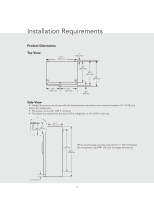
Refrigerator Safety, Installation Requirements - dimensions
 |
View all Viking DDSF136DSS manuals
Add to My Manuals
Save this manual to your list of manuals |
Page 4 highlights
Refrigerator Safety Installation Requirements Tools and Parts IMPORTANT: • Observe all governing codes and ordinances. • Installer: Leave Installation Instructions with homeowner. • Homeowner: Keep Installation Instructions for future reference and for the local electrical inspector's use. • Keep cardboard shipping piece or plywood under refrigerator until it is installed in the operating position. • Comply with installation specifications and dimensions. • Remove any moldings or decorative panels from kitchen cabinets that would not allow access to the refrigerator for service. • Contact a qualified electrical installer. TOOLS NEEDED: Gather the required tools and parts before starting installation. Read and follow the instructions provided with any tools listed here. • Cordless drill • 5⁄16" or adjustable wrench • 1⁄4" Nut driver and drill bit • 7⁄16" and ¹⁄2" Open-end wrenches • Flat-blade screwdriver • Two adjustable wrenches • 3⁄8" and ¹⁄2" Socket wrenches PARTS NEEDED: • 1⁄4" (6.35 mm) copper tubing with shutoff valve and a 1⁄4" (6.35 mm) compression fitting (coupling). • Depending on water line connections, you may also need a 1⁄4" (6.35 mm) nut and 1⁄4" (6.35 mm) ferrule. 2
-
 1
1 -
 2
2 -
 3
3 -
 4
4 -
 5
5 -
 6
6 -
 7
7 -
 8
8 -
 9
9 -
 10
10 -
11
-
12
-
13
-
14
-
15
-
16
-
17
-
18
-
19
-
20
-
21
-
22
-
23
-
24
-
25
-
26
-
27
-
28
-
29
-
30
-
31
-
32
-
33
-
34
-
35
-
36
-
37
-
38
-
39
-
40
-
41
-
42
-
43
-
44
-
45
-
46
-
47
-
48
 |
 |
