Viking FDW100 Installation Instructions - Page 11
Electrical Connection, Readjusting Leveling Legs
 |
View all Viking FDW100 manuals
Add to My Manuals
Save this manual to your list of manuals |
Page 11 highlights
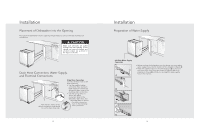
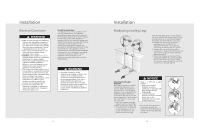
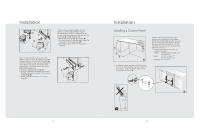
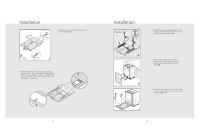
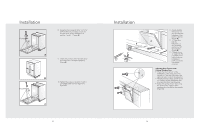
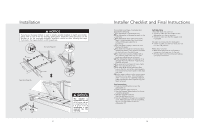
Installation Electrical Connection WARNING • Make sure the voltage and frequency listed on the data plate correspond with the household electrical supply. This data must correspond to prevent injury and machine damage. Consult a qualified electrician if in doubt. • Only connect the dishwasher to the mains when all installation and plumbing work is done. • DO NOT use any extension cord or portable outlet device to connect the dishwasher to a power supply. • The power-supply receptacle for the appliance shall be installed in a cabinet or on a wall adjacent to the undercounter space in which the appliance is to be installed. • The access hole of the supply cord to the installation compartment must be smooth and rounded and it must be large enough for the attachment plug to pass through. The longest dimension of the opening shall not be more than 1.5" (35mm). If the partition is metal, it needs to be covered with an edge protector. • Care must be taken when the appliance is installed or removed, to reduce the likelihood of damage to the power-supply cord. Grounding Instructions This appliance must be grounded. In the event of a malfunction or breakdown, grounding will reduce the risk of electrical shock by providing a path of least resistance for electrical current. This appliance is equipped with a cord having an equipmentgrounding conductor and a grounding plug. The plug must be plugged into an appropriate outlet that is installed and grounded in accordance with all local codes and ordinances. This appliance must be connected to a grounded metal, permanent wiring system, or an equipment-grounding conductor must be run with the circuit conductors and connected to the equipment-grounding terminal or lead on the appliance. WARNING • Improper connection of the equipment-grounding conductor can result in a risk of electric shock. Check with a qualified electrician or service representative if you are in doubt whether the appliance is properly grounded. Do not modify the plug provided with the appliance; if it will not fit the outlet, have a proper outlet installed by a qualified electrician. 19 Installation Readjusting Leveling Legs Now that the dishwasher is in the cabinet, you must readjust the leveling legs to bring the dishwasher up to the required height and attach it underneath the countertop. • Readjust the front leveling leg with adjusting wrench to balance the dishwasher and raise it up under the countertop; make sure the unit is level. • Readjust the rear leveling leg with a screwdriver to balance the dishwasher and raise it to the required height using the brackets supplied. • Attach the dishwasher underneath the countertop with the four screws supplied (Ø 1/8"x1/8"-Ø 3.5mmx14mm). Make sure you do not go through the top of the countertop or damage granite. NOTICE Adjusting the Movable There is a left and a right Kickplate bracket. Now that you have successfully • Adjust the kickplate installed the dishwasher, you need to attach the kickplate to brackets forward or backwards so that they will A the dishwasher. The two-piece align with the kitchen kickplate can be adjusted to the kickplate (B). height and depth needed for • Lock the kickplate your kitchen. Be sure to use the brackets as shown with the slotted kickplate in the front and plastic tab on the the other behind it. They slide dishwasher into the teeth into each other. of the bracket (C). B 1. Insert the movable kickplate brackets into the channel (A). 2. Make sure that the plastic tab 3. Now attach the kickplate to to the left of the "L" opening the bracket with the two on the dishwasher has not (Ø 3/16"x1/4"-Ø 4mmx6mm) closed the channel you will screws and the caps provided push the bracket through. as follows. C 20
-
 1
1 -
2
-
3
-
4
-
5
-
 6
6 -
 7
7 -
 8
8 -
 9
9 -
 10
10 -
 11
11 -
 12
12 -
 13
13 -
 14
14 -
 15
15 -
 16
16
 |
 |
