Viking FDW100 Installation Instructions - Page 15
Installation, Installer Checklist and Final Instructions
 |
View all Viking FDW100 manuals
Add to My Manuals
Save this manual to your list of manuals |
Page 15 highlights
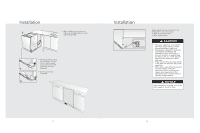
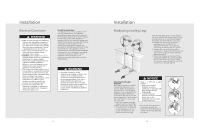
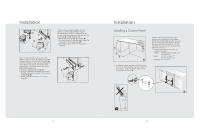
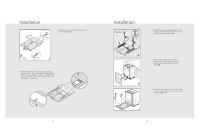
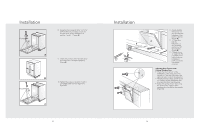
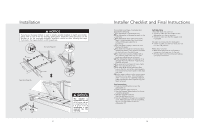
Installation NOTICE If you have a European kitchen or want to install a wooden kickplate to match your kitchen, please refer to one of the two drawings given below. Follow the same instructions on the brackets as for the removable kickplate. Installation should be done following the steps illustrated in the Figures A, B, C, and D respectively. See also Page 21. See also Page 26. NOTICE The installer is responsible for the dishwasher installation. Incorrect installation is not covered by the warranty. 27 Installer Checklist and Final Instructions Your installer must have completed and checked the following: KThe dishwasher is square and level. KThe dishwasher is fastened securely to the cabinetry. KThe dishwasher door opens and closes freely. The dishwasher door must close without hitting any cabinetry or countertop. KThe inlet water supply is turned on and checked for leaks. KThe drain hose has been connected and checked for leaks. There must be no kinks or obstructions in the drain hose. KThe drain hose must be installed with a 28" (710mm) high drain loop for drain hook-ups without any air removed. KIf the dishwasher drain is hooked up to a garbage disposal, the drain hopper plug must be removed. KThe spray arms are free and rotate freely. KThe rinse cycle has been run. KThe water level will be below the filter screen after the end of the wash program. It is normal to find some water in the drain filter area. KSet the water softener to the correct water hardness for your area. If the dishwasher drain is connected to a garbage disposal, make sure that the drain/hopper plug has been removed. Final Instructions • Press the On/Off button to turn the dishwasher on. • Power indicator light comes on. • Use the Program Select button to choose a washing program. • Start the program with the Start/Pause/Cancel button. • Run the dishwasher through one complete cycle. When the wash cycle is completed, use the On/Off button to turn the dishwasher off. Self-Help Hints The screen does not come on: • Check to make sure the breaker to the dishwasher is in the on position. • Check to make sure that the supply cord is plugged. No water is coming into the dishwasher: • Check to make sure the hot water shut-off is in the ON position. Water does not drain: • Make sure drain hose is not kinked or comes out of air gap next to the sink. • Remove drain hose from disposal making sure plug is removed. 28
-
 1
1 -
2
-
3
-
4
-
5
-
6
-
7
-
8
-
9
-
 10
10 -
 11
11 -
 12
12 -
 13
13 -
 14
14 -
 15
15 -
 16
16
 |
 |
