Viking FDW100 Installation Instructions - Page 7
Enclosure Preparation, Installation Preparation
 |
View all Viking FDW100 manuals
Add to My Manuals
Save this manual to your list of manuals |
Page 7 highlights
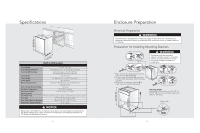
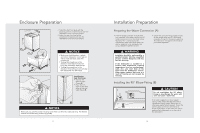
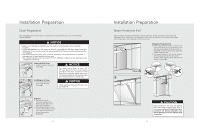
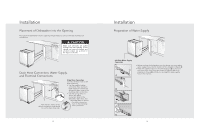
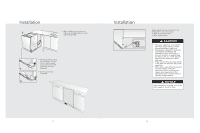
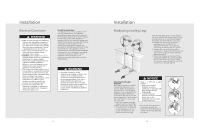
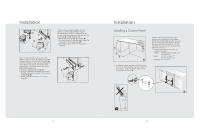
Enclosure Preparation • Adjust the front foot level with the adjusting wrench to balance and raise the dishwasher to the enclosure height. • Adjust the rear foot level with a screwdriver to balance and raise the dishwasher to the enclosure height. NOTICE • Make sure the dishwasher is plumb and notice dishwasher can be placed T20 with a small clearance under the counter top. • Turning the screwdriver in the direction of the black arrows will bring the dishwasher back feet up. • Turning the screwdriver in the direction of the white arrows will take the dishwasher rear feet down. Installing the Side Trim Strips • Remove the adhesive tape (Figure A). • Place the trim strips on the front edge of the side walls (Figure B). A B NOTICE Make sure you use the correct trim strip since there is a left and a right side strip. The flexible material should be facing forward (Figure B). 11 Installation Preparation Preparing the Water Connection (A) • Install an easily accessible shut-off valve (not supplied) in the water supply line. All solder connections must be made before the water line is connected to the dishwasher's water inlet valve. Water can also be supplied to the dishwasher by using a flexible braided hose line. • Check with your plumbing supply sources for the proper hose and 90° elbow and necessary fittings for the water supply line. This material is not supplied and must be purchased separately. WARNING Installation should be performed by a qualified installer. Work by unqualified persons could be dangerous and may void the warranty. If the dishwasher is installed in a location that experiences freezing temperatures (e.g. in a vacation home, cabin, etc.), you must drain all the water from the dishwasher's interior. Water system ruptures that occur as a result of freezing are not covered by warranty. Installing the 90° Elbow Fitting (B) CAUTION B Do not overtighten the 90° elbow. Doing so may damage the water inlet valve and cause a water leak. If the water supply line is to be copper tubing, make certain that the elbow has a compression fitting. Apply Teflon tape or other pipe sealant when required. Orient the A water supply connection downwards as shown in the figure so the water line can be easily pulled underneath or on the side of the dishwasher. 12
-
 1
1 -
 2
2 -
 3
3 -
 4
4 -
 5
5 -
 6
6 -
 7
7 -
 8
8 -
 9
9 -
 10
10 -
 11
11 -
 12
12 -
13
-
14
-
15
-
16
 |
 |
