Viking FDW100 Installation Instructions - Page 13
marked holes.
 |
View all Viking FDW100 manuals
Add to My Manuals
Save this manual to your list of manuals |
Page 13 highlights
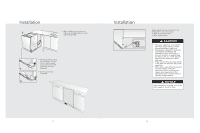
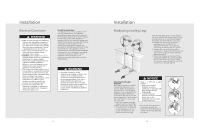
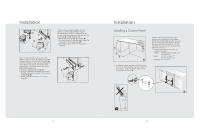
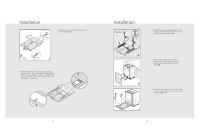
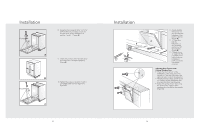
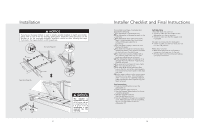
Installation 3. Mark the wooden door as shown in the drawing (Figure C). 4. Place the plastic mounting brackets over the marked holes. Align the bottom of the bracket with the horizontal line. Align the middle of the bracket with the center line using the "V" cut in the bracket. (Figure D) 23 Installation Ø 1/8" (3,5mm) x4 v 5. Attach the two mounting brackets to the wooden door with 4 screws (Ø 1/8"x5/8" (Ø 3.55mmx14mm) (Figure A). A 6. Mount the wooden door onto the dishwasher with the plastic mounting brackets which you have attached (Figure B). B 7. Open the door and remove the two caps and two screws inside the door at position 1 and 4 (Figure C). C 24
-
 1
1 -
2
-
3
-
4
-
5
-
6
-
7
-
 8
8 -
 9
9 -
 10
10 -
 11
11 -
 12
12 -
 13
13 -
 14
14 -
 15
15 -
 16
16
 |
 |

24
23
Installation
Installation
3. Mark the wooden door as shown in the
drawing (Figure
C
).
5. Attach the two mounting brackets to the
wooden door with 4 screws (Ø 1/8”x5/8”
(Ø 3.55mmx14mm) (Figure
A
).
6. Mount the wooden door onto the
dishwasher with the plastic mounting
brackets which you have attached
(Figure
B
).
7. Open the door and remove the two caps
and two screws inside the door at position
1 and 4 (Figure
C
).
4. Place the plastic mounting brackets over the
marked holes.
Align the bottom of the bracket
with the horizontal line.
Align the middle of the
bracket with the center line using the “V” cut in
the bracket.
(Figure D)
Ç
±³
Á
±²
²
º
»
³
²´µ¶·¸¸¹
È
É