Viking FDW100WS Installation Instructions - Page 12
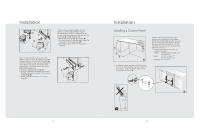
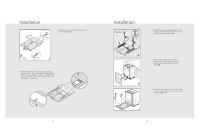
Installing a Custom Panel
 |
View all Viking FDW100WS manuals
Add to My Manuals
Save this manual to your list of manuals |
Page 12 highlights
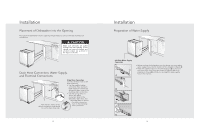
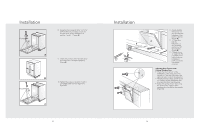
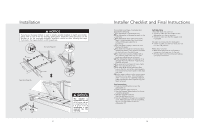
Installation o A B t s C If the enclosure height is below 33-1/16" (84.0cm), use only (o) labeled kickplate (kickplate without slots). Installation should be done following the steps illustrated in the Figures A, B, and C respectively. 1. Bend tabs on kickplate (o) inwards (A). 2. Secure kickplate to brackets with screws (t) as shown in the supply bags (B). 3. Attach caps (s) as shown in the supply bags (C). If the enclosure height is above 33-1/16" (84.0cm), use "o" and "p" labeled kickplates together. Make sure the slotted kickplate (p) is on the outside so you can adjust height of the kickplate. Installation should be done following the steps illustrated in the figures A, B, and C respectively. 1. Align the kickplate (o) and (p) (A). 2. Secure kickplates to brackets with screws (t) after adjusting the height of the slotted kickplate (p) (B). 3. Attach caps (s) as shown in the supply bags (C). A o p B t s C Installation Installing a Custom Panel ? ? A 2. To take the plastic bracket out, first remove the screws located at the top and bottom of the bracket. Save the screws, they will be used in Step 5. (Figure B). Measure the height and width of the enclosure (Figure A) and the kickplate. Determine how big the wooden door can be. For example, if the height is 33-7/8" (86.0cm) and if the kickplate is 3-15/16" (10.0cm), the door can not be taller than 29-15/16" (76.0cm). 1. Prepare the wooden door with the mounting brackets. Height: Height of the wooden door 30" (76.2cm) Width: 23-1/4" to 23-1/2" (59.1cm to 59.7cm) Thickness: 3/4" (1.9cm) B 21 22
-
 1
1 -
2
-
3
-
4
-
5
-
6
-
 7
7 -
 8
8 -
 9
9 -
 10
10 -
 11
11 -
 12
12 -
 13
13 -
 14
14 -
 15
15 -
 16
16
 |
 |
