Vivitar DVR 518 Camera Manual - Page 17
Video Setting options - recording
 |
View all Vivitar DVR 518 manuals
Add to My Manuals
Save this manual to your list of manuals |
Page 17 highlights
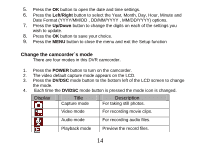
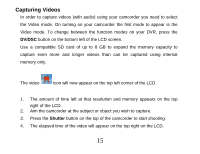
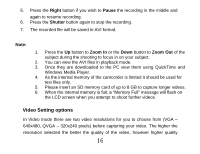
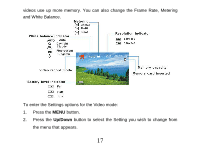
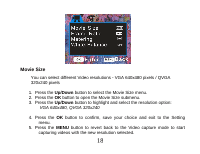
5. Press the Right button if you wish to Pause the recording in the middle and again to resume recording. 6. Press the Shutter button again to stop the recording. 7. The recorded file will be saved in AVI format. Note: 1. Press the Up button to Zoom In or the Down button to Zoom Out of the subject during the shooting to focus in on your subject. 2. You can view the AVI files in playback mode. 3. Once they are downloaded to the PC view them using QuickTime and Windows Media Player. 4. As the internal memory of the camcorder is limited it should be used for test files only. 5. Please insert an SD memory card of up to 8 GB to capture longer videos. 6. When the internal memory is full, a "Memory Full" message will flash on the LCD screen when you attempt to shoot further videos. Video Setting options In Video mode there are two video resolutions for you to choose from (VGA - 640x480, QVGA - 320x240 pixels) before capturing your video. The higher the resolution selected the better the quality of the video, however higher quality 16
-
 1
1 -
2
-
3
-
4
-
5
-
6
-
7
-
8
-
9
-
10
-
11
-
 12
12 -
 13
13 -
 14
14 -
 15
15 -
 16
16 -
 17
17 -
 18
18 -
 19
19 -
 20
20 -
 21
21 -
 22
22 -
23
-
24
-
25
-
26
-
27
-
28
-
29
-
30
-
31
-
32
-
33
-
34
-
35
-
36
-
37
-
38
-
39
-
40
-
41
-
42
-
43
-
44
-
45
-
46
-
47
-
48
-
49
-
50
-
51
-
52
-
53
-
54
-
55
-
56
-
57
-
58
-
59
-
60
-
61
-
62
-
63
-
64
-
65
-
66
-
67
-
68
-
69
-
70
-
71
-
72
-
73
-
74
 |
 |
