Vivitar DVR 940XHD DVR 940HD Camera Manual - Page 15
ViviLink Button, ViviLink, Remember, Video Playback Mode
 |
View all Vivitar DVR 940XHD manuals
Add to My Manuals
Save this manual to your list of manuals |
Page 15 highlights
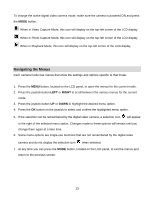
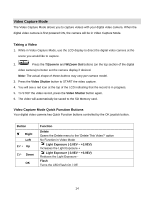
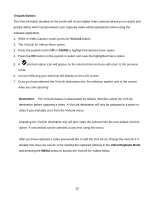
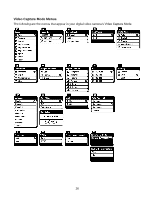
ViviLink Button: The ViviLink button (located on the inside wall of your digital video camera) allows you to easily and quickly define which social network your captured video will be uploaded to when using the software application. 1. While in Video Capture mode, press the ViviLink button. 2. The ViviLink for Videos Menu opens. 3. Press the joystick button UP or DOWN to highlight the desired menu option. 4. Press the OK button on the joystick to select and save the highlighted menu option. 5. A selected option icon will appear on the selected item and you will return to the previous mode. 6. An icon reflecting your selection will display on the LCD screen. 7. Once you have selected the ViviLink destination site, the selection applies only to the current video you are capturing. Remember: The ViviLink feature is deactivated by default, therefore select the ViviLink destination before capturing a video. A ViviLink destination will only be assigned to a photo or video if you manually set it from the ViviLink menu. Changing the ViviLink destination site will also make the selected site the new default ViviLink option. A new default can be selected at any time using this menu. After you have captured a video and would like to add the ViviLink (or change the ViviLink if it already has one) you can do so by viewing the captured video(s) in the Video Playback Mode and pressing the MENU button to access the ViviLink for Videos Menu. 15
-
 1
1 -
2
-
3
-
4
-
5
-
6
-
7
-
8
-
9
-
 10
10 -
 11
11 -
 12
12 -
 13
13 -
 14
14 -
 15
15 -
 16
16 -
 17
17 -
 18
18 -
 19
19 -
 20
20 -
21
-
22
-
23
-
24
-
25
-
26
-
27
-
28
-
29
-
30
-
31
-
32
-
33
-
34
-
35
-
36
-
37
-
38
-
39
-
40
-
41
-
42
-
43
-
44
-
45
-
46
-
47
-
48
-
49
-
50
-
51
-
52
-
53
-
54
-
55
-
56
-
57
-
58
-
59
-
60
-
61
-
62
-
63
-
64
-
65
 |
 |