Waring WJX80 Instruction Manual - Page 7
Assembling Your Waring, Commercial, Juice Extractor, Operating Instructions
 |
View all Waring WJX80 manuals
Add to My Manuals
Save this manual to your list of manuals |
Page 7 highlights
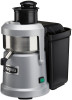
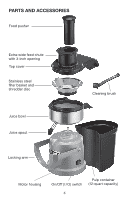
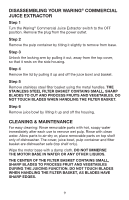
ASSEMBLING YOUR WARING® COMMERCIAL JUICE EXTRACTOR For your safety, the juice extractor will not operate until the machine is properly assembled. To assemble this unit, the following steps must be followed in the order given. Step 1 Place juice bowl on top of the motor housing. Step 2 Place the stainless steel filter basket inside the center of the juice bowl. Make sure it slides into place by pressing firmly and spinning until it locks into place. To avoid injury, do not press on shredder disc. Step 3 Place the top cover onto the housing by aligning the tabs on both sides. If cover does not fit, this means that the filter basket is not properly seated onto the juice bowl. Step 4 Lock the top cover into place with the locking arm by lifting arm up so that it snaps the lid down onto the juicing assembly. Step 5 Place the pulp container into place to the right of the housing by sliding it under the top cover. Tilt and push bottom of pulp container into unit until it is seated properly. NOTE: Unit will not operate if top cover and pulp container are not properly positioned. OPERATING INSTRUCTIONS NOTE: The juice extractor will not operate until the top cover and pulp container are locked into position. Step 1 Wash your fruit and vegetables for juicing. NOTE: Most fruit and vegetables such as apples, carrots and cucumbers will not need to be cut to size, as they will fit into the feed chute whole. Step 2 Ensure that the juice extractor is correctly assembled and that a juice collector cup is placed under the spout while juicing. 7
-
 1
1 -
 2
2 -
 3
3 -
 4
4 -
 5
5 -
 6
6 -
 7
7 -
 8
8 -
 9
9 -
 10
10 -
 11
11 -
 12
12 -
13
-
14
-
15
-
16
-
17
-
18
-
19
-
20
-
21
-
22
-
23
-
24
-
25
-
26
-
27
-
28
-
29
-
30
-
31
-
32
-
33
-
34
-
35
-
36
-
37
-
38
-
39
-
40
 |
 |
