Weider Easy Compact 90 Uk Manual - Page 5
Assembly - parts
 |
View all Weider Easy Compact 90 manuals
Add to My Manuals
Save this manual to your list of manuals |
Page 5 highlights
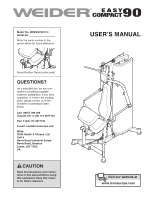
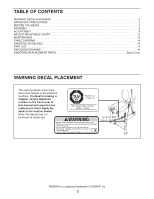
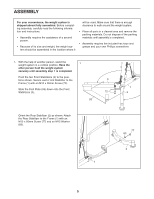
ASSEMBLY For your convenience, the weight system is shipped almost fully assembled. Before completing assembly, carefully read the following information and instructions. • Assembly requires the assistance of a second person. • Because of its size and weight, the weight system should be assembled in the location where it will be used. Make sure that there is enough clearance to walk around the weight system. • Place all parts in a cleared area and remove the packing materials. Do not dispose of the packing materials until assembly is completed. • Assembly requires the included hex keys and grease and your own Phillips screwdriver. 1. With the help of another person, stand the 1 weight system in a vertical position. Have the other person hold the weight system securely until assembly step 1 is completed. Pivot the two Front Stabilizers (3) to the positions shown. Secure each Front Stabilizer to the Frame (1) with an M12 x 30mm Screw (72). Slide the Foot Plate (93) down onto the Front Stabilizers (3). 3 1 72 3 93 Orient the Rear Stabilizer (2) as shown. Attach the Rear Stabilizer to the Frame (1) with an M12 x 60mm Screw (77) and an M12 Washer (83). 77 83 2 1 5
-
 1
1 -
 2
2 -
 3
3 -
 4
4 -
 5
5 -
 6
6 -
 7
7 -
 8
8 -
 9
9 -
 10
10 -
 11
11 -
12
-
13
-
14
-
15
-
16
-
17
-
18
-
19
-
20
 |
 |