Weider Flex 1000 English Manual - Page 7
Seat Mounting Plate
 |
View all Weider Flex 1000 manuals
Add to My Manuals
Save this manual to your list of manuals |
Page 7 highlights
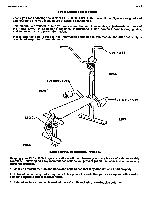
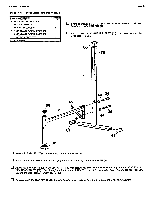
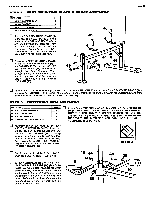
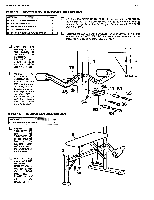
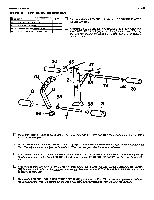
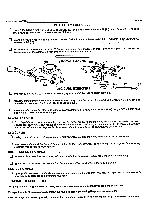
WBDER HEALTH and FITNESS STEP 2 SEAT MOUNTING PLATE & BRACE ASSEMBLY PART NAME 46 1/4" X 2" CARRIAGE BOLT 47 1/4" FLAT WASHER 48 1/4" NYLON LOCK NUT 49 1/4" X 2" MACHINE SCREW QTY 2 2 3 1 O Attach a SEAT MOUNTING PLATE (4) to the rear of the BACKBONE (2) using a 1/4" X 2" CARRIAGE BOLT (46) to bolt down through the Mounting Plate and then through the top ' of the Backbone. Assemble a 1/4" FLAT WASHER (47) onto the bolt and secure with a 1/4" NYLON LOCK NUT (48). O Assemble a SEAT MOUNTING PLATE (4) and the BACKBONE BRACE (3) to the BACKBONE (2) using a 1/4" X 2" CARRIAGE BOLT (46) to bolt down through the Seat Mounting Plate, through the top of the Backbone, and then through one end of the Backbone Brace. Secure with a 1/4" NYLON LOCK NUT (48). 49 47 $ 7 PAGE 6 O Assemble a 1/4" FLAT WASHER (47) onto a 1/4" X 2" MACHINE SCREW (49) and attach the BACKBONE BRACE (3) to the leg of the BACKBONE (2) by bolting through the front of the Backbone leg and then through the unassembled end of the Backbone Brace. Secure with a 1/4" NYLON LOCK NUT (48). STEP 3 BUTTERFLY ARM ASSEMBLY PART NAME ' 35 5/16" X 3" HEX HEAD BOLT 44 5/16" FLAT WASHER 45 5/16" NYLON LOCK NUT 56 1" SQUARE PLASTIC INSERT CAP • :I:',117( :: : u 2 4 2 2 Assemble the BUTTERFLY ARMS (9) and (10) into the UPRIGHT (1). TO DO THIS, TURN THE BUTTERFLY ARMS AT AN ANGLE SO THAT THE ARM AND THE WELDED SPACER FIT INTO THE OPENING OF THE UPRIGHT FRAME. ONCE INSIDE THE FRAME TUBE TWIST THE BUTTERFLY ARM BACK INTO A STRAIGHT ALIGNMENT. (SEE DETAIL A) Assemble a 5/16" FLAT WASHER (44) onto a 5/16" X 36 HEX HEAD BOLT (35) and bolt the BUTTERFLY ARMS (9) and (10) into position in the UPRIGHT (1) by bolting through the front of the Upright and then through the welded spacer in the Butterfly Arm. Assemble a 5/16" FLAT WASHER (44) onto the bolt and secure with a 5/16" NYLON LOCK NUT (45). DETAIL A Cap the ends of the Butterfly Arms with 1" 45 44 SQUARE PLASTIC INSERT CAPS (56). u To aid in assembling the 2 3/4" X 5" X 1" \ OB- I.D. FOAM ROLLER PADS (14) (This is the Foam Roller of this size which has the larger inside diameter) to the Butterfly Arms, wipe a small amount of liquid dish detergent along ••%, 6 6 a 10 the surface of the end of the Butterfly Arm tubes. Slide the Foam Roller Pads onto the 56 Butterfly Arms until they are flush with the end of the Butterfly Arms.
-
 1
1 -
 2
2 -
 3
3 -
 4
4 -
 5
5 -
 6
6 -
 7
7 -
 8
8 -
 9
9 -
 10
10 -
 11
11 -
 12
12
 |
 |
