Weider Flex 1000 English Manual - Page 9
positioned
 |
View all Weider Flex 1000 manuals
Add to My Manuals
Save this manual to your list of manuals |
Page 9 highlights
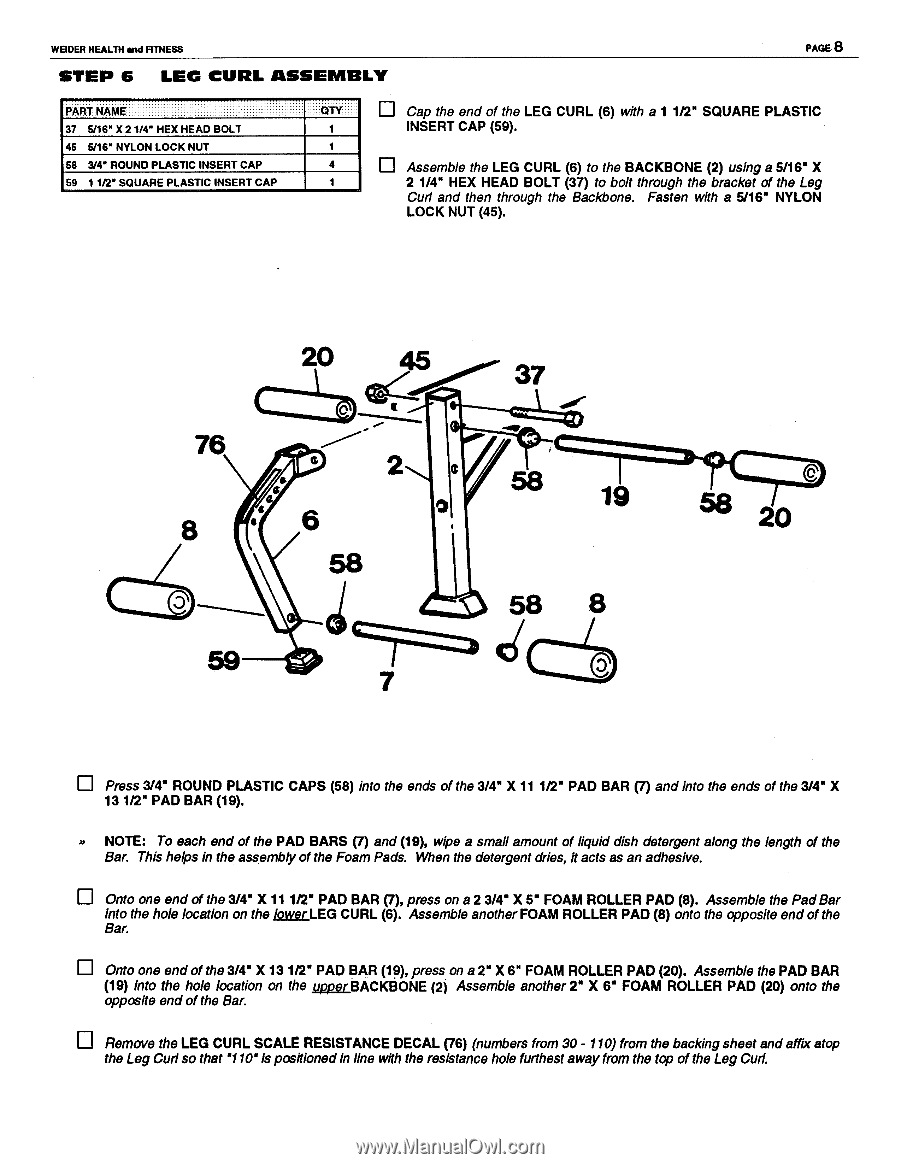
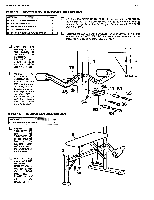
WEIDER HEALTH and RTNESS STEP 6 LEG CURL ASSEMBLY PAGE PART NAME 37 5/16" X 2 1/4" HEX HEAD BOLT 45 5/16" NYLON LOCK NUT 58 3/4" ROUND PLASTIC INSERT CAP 59 11/2" SQUARE PLASTIC INSERT CAP QTY u Cap the end of the LEG CURL (6) with a 1 1/2" SQUARE PLASTIC 1 INSERT CAP (59). 1 4 u Assemble the LEG CURL (6) to the BACKBONE (2) using a 5/16" X 1 2 1/4" HEX HEAD BOLT (37) to bolt through the bracket of the Leg Curl and then through the Backbone. Fasten with a 5/16" NYLON LOCK NUT (45). 20 C 76 a $ • 37 0 O 19 sa 20 58 eft u Press 3/4" ROUND PLASTIC CAPS (58) into the ends of the 3/4" X 11 1/2" PAD BAR (7) and into the ends of the 3/4" X 13 1/2" PAD BAR (19). NOTE: To each end of the PAD BARS (7) and (19), wipe a small amount of liquid dish detergent along the length of the Bar. This helps in the assembly of the Foam Pads. When the detergent dries, it acts as an adhesive. Onto one end of the 3/4" X 111/2' PAD BAR (7), press on a 2 3/4" X 5" FOAM ROLLER PAD (8). Assemble the PadBar Into the hole location on the lower LEG CURL (6). Assemble another FOAM ROLLER PAD (8) onto the opposite end of the Bar. u Onto one end of the 3/4" X 13 1/2" PAD BAR (19), press on a 2" X 6" FOAM ROLLER PAD (20). Assemble the PAD BAR (19) into the hole location on the upper BACKBONE (2) Assemble another 2" X 6' FOAM ROLLER PAD (20) onto the opposite end of the Bar. Remove the LEG CURL SCALE RESISTANCE DECAL (76) (numbers from 30 -110) from the backing sheet and affix atop the Leg Curl so that '110"Is positionedin line with the resistance hole furthest away from the top of the Leg Curl.
-
 1
1 -
2
-
3
-
 4
4 -
 5
5 -
 6
6 -
 7
7 -
 8
8 -
 9
9 -
 10
10 -
 11
11 -
 12
12
 |
 |