Weider Flex 450 English Manual - Page 16
Press, Assembly, Pec-deck
 |
View all Weider Flex 450 manuals
Add to My Manuals
Save this manual to your list of manuals |
Page 16 highlights
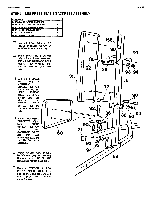
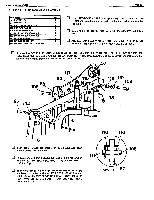
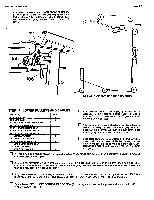
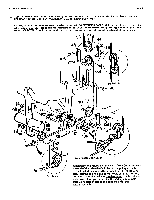
WEIDER HEALTH end FITNESS STEP 11 ARM PRESS ASSEMBLY PAGE 16 PART NAME 77 1* ROUND PLASTIC CAP 81 11/4" SQUARE INSERT BUSHING 100 5/16" X 2 3/4" HEX HEAD BOLT 104. W16" FLAT WASHER 105 5/16" NYLON LOCK NUT 110 3/8' FLAT WASHER 114 3/4" LONG METAL SPACER QTY 2 Into each end of the ARM PRESS ASSEMBLY (21) cross 4 tubes, insert a 1 1/4' SQUARE BUSHING (81). SEE 1 DETAIL B 1 1 Align ARM PRESS ASSEMBLY (21) to the front of the 1 TOP FRAME (15) and insert CHROME PLATED 1" X 13" 1 PIVOT TUBE (40) through ARM PRESS ASSEMBLY (21) and TOP FRAME (15). Rotate Pivot Tube until bolt holes align and assemble a 3/8' FLAT WASHER (110) and 5/16' X 1/2" LONG SPACER (113) onto a 5/16" X 2 3/4" HEX HEAD BOLT (100) and insert from bottom up through Frame and Pivot Tube and attach with another 5/16" FLAT WASHER (104) and 5/16" NYLON LOCK NUT (105). SEE DETAIL A D Press a 1" ROUND PLASTIC CAP (77) into each end of CHROME PLATED PIVOT TUBE (40). O Remove POWER STACK DECAL (150) from backing and adhere it onto ARM PRESS ASSEMBLY (21). 5 40 W) 104 77 81 81 77 15 114 100 21 \21 DETAIL A L.- DETAIL B 150 STEP 12 PEC-DECK ARMS PART NAME 71 2" SQUARE PLASTIC CAP 77 1" ROUND PLASTIC CAP 81 1 1/4" SQUARE END BUSHING 96 5/16" X 1 1/2" HEX HEAD BOLT 105 5/16" NYLON LOCK NUT 112 LARGE WASHER 1 1/2" I.D. X 2" O.D. 131 5/16" X 4 3/4 PECK DECK LOCK PIN QTY 4 4 4 2 2 2 2 u Press a 1 1/4" SQUARE PLASTIC BUSHING (81) into the ends of the ARM PRESS ASSEMBLY (21). D Insert PEC-DECK ARM (22) Pivot Tube into ARM PRESS ASSEMBLY (21) and place a large 1 1/2" FLAT WASHER (112) over Pivot Tube SEE DETAIL A. O Secure Pec-Deck Arms in place by bolting through top of Pivot Tubes with 5/16" X 1 1/2" HEX HEAD BOLT (96) and 5/16" NYLON LOCK NUT (105). El Cap top and bottom of Pivot Tube with 1' ROUND PLASTIC INSERT CAPS (77).
-
 1
1 -
2
-
3
-
4
-
5
-
6
-
7
-
8
-
9
-
10
-
 11
11 -
 12
12 -
 13
13 -
 14
14 -
 15
15 -
 16
16 -
 17
17 -
 18
18 -
 19
19 -
 20
20 -
 21
21 -
22
-
23
-
24
 |
 |
