Weider Flex 450 English Manual - Page 5
Bolts
 |
View all Weider Flex 450 manuals
Add to My Manuals
Save this manual to your list of manuals |
Page 5 highlights
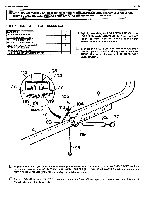
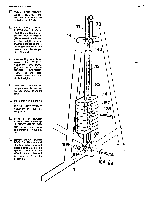
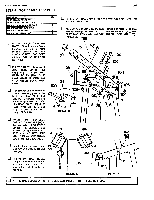
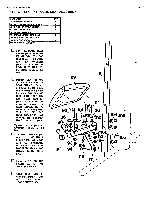
WEIDER HEALTH and FITNESS PAGE 5 •.NOTE: D0 NOT.TIGHTEN BOLTS IN THE FIRST 4 STEPS OF ASSEMBLIES UNTIL THE CONCLUSION OF STEP 4. THIS WILL MAKE THE ALIGNMENT OF PARTS EASIER AS THE FRAME STRUCTURE IS BUILT. STEP 1 BASE & UPRIGHT ASSEMBLY PART NAME OTY 70 2" SQUARE FOOT CAP 4 71 2' SQUARE INSERT CAP 2 77 1" ROUND INSERT CAP 2 98 5/16" X 21/4" HEX HEAD BOLT 7 100 5/16" X 2 3/4" HEX HEAD BOLT 2 104 5/16' FLAT WASHER 1 105 5/16" NYLON LOCK NUT 9 113 5/16' I.D. X 1/2" LONG METAL SPACER 1 El Begin by assembling the LEG PRESS ARM (8) to the LEG PRESS BASE EXTENSION (4). (See Detail "A".) For this assembly, orient the base extension so that dimpled in bolt holes are underneath. El Insert the 1" X 5 1/2" LONG LEG PRESS PIVOT TUBE (33) through the U-bracket with spacers of the LEG PRESS ARM (8) and through the LEG PRESS BASE EXTENSION (4). 113 105 104 77 II 77 119 119 DETAIL A 77 105 \t.o. 113 104 tte I 6 119 e c 33 77 it98 El Align the bolt hole in Pivot Tube with bolt hole through Base Extension and insert 5/16" X 2 1/4" HEX HEAD BOLT (98) from bottom and assemble a 5/16" I.D. X 1/2" LONG METAL SPACER (113), 5/16" FLAT WASHER (104), and secure with 5/16" NYLON LOCK NUT (105). (This assembly can be tightened firmly.) El Press 1" ROUND INSERT CAP (77) into each end of the Pivot Tube. (These caps should be ones with largest diameter.) (See detailed view of final assembly.)
-
 1
1 -
 2
2 -
 3
3 -
 4
4 -
 5
5 -
 6
6 -
 7
7 -
 8
8 -
 9
9 -
 10
10 -
 11
11 -
12
-
13
-
14
-
15
-
16
-
17
-
18
-
19
-
20
-
21
-
22
-
23
-
24
 |
 |
