Weslo Eclipse 2 Elliptical User Manual - Page 6
Assembly
 |
View all Weslo Eclipse 2 Elliptical manuals
Add to My Manuals
Save this manual to your list of manuals |
Page 6 highlights
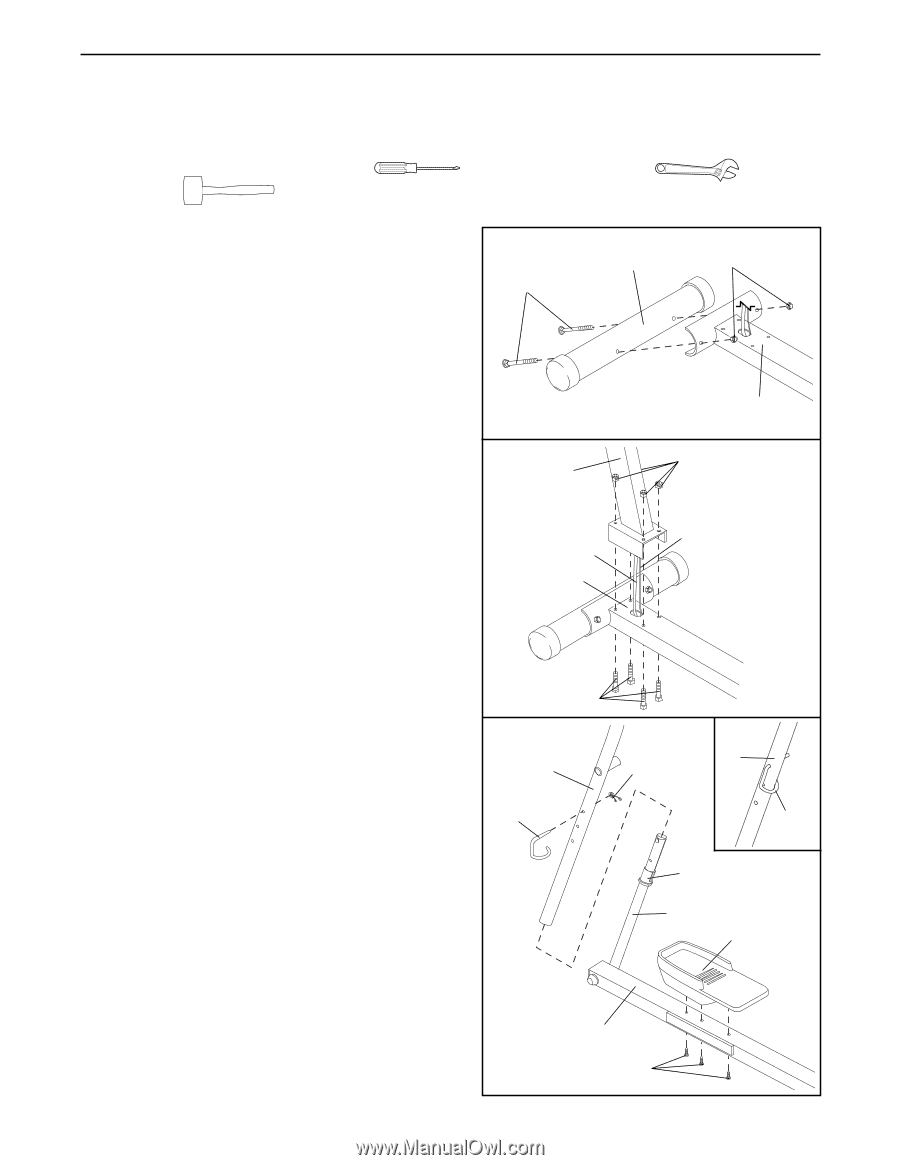
ASSEMBLY Assembly requires two persons. Place all parts of the WESLO® ECLIPSE II in a cleared area and remove the packing materials. Do not dispose of the packing materials until assembly is completed. Assembly requires a phillips screwdriver rubber mallet . , two adjustable wrenches , and a 1. Hold one of the Stabilizers (68) against the saddle on the front of the Base (1). Make sure that the Stabilizer is turned so the square holes are facing away from the saddle. Attach the Stabilizer with two M10 x 75mm Carriage Bolts (66) and two M10 Nylon Locknuts (54). Attach the other Stabilizer to the saddle on the back of the Base (not shown). 1 66 68 54 2. While another person holds the Upright (2), gently pull the Extension Wire (49) and the Resistance 2 Cable (33) up through the Upright until there is no slack between the Upright and the Base (1). Insert the four M10 x 68mm Bolts (67) up through the Base (1). Slide the Upright (2) onto the Bolts. Be careful to avoid pinching the Extension Wire (49) and the Resistance Cable (33). Tighten an M10 Nylon Locknut (54) onto each Bolt. 2 33 1 1 54 49 67 3. Identify the Left Handlebar (6) and the Left Pedal Leg (3) (there are stickers on the Handlebars and Pedal 3 Legs for identification). 6 3a 6 38 Slide the Left Handlebar (6) onto the left Extension Tube (5). Press the Handlebar Bushing (45) up into 37 the Left Handlebar. Align one of the three holes in the Left Handlebar with the hole in the Extension Tube. Insert the Left Lock Pin (37) into the holes, make sure the Left Lock Pin is in the position shown in drawing 3a, and attach a Spring Clip (38) to the Left Lock Pin. Attach a Pedal (29) to the Left Pedal Leg (3) with three M4 x 16mm Screws (42). 37 45 5 29 Repeat this step to attach the Right Handlebar, right Extension Tube, and Right Pedal Leg (not shown). 3 42 6
-
 1
1 -
 2
2 -
 3
3 -
 4
4 -
 5
5 -
 6
6 -
 7
7 -
 8
8 -
 9
9 -
 10
10 -
 11
11 -
 12
12 -
13
-
14
-
15
-
16
-
17
-
18
 |
 |