Westinghouse MT80 ARM20 Installation Instructions - Page 6
fig. 2.1, fig. 2.2, fig. 2.3, VESA 100, VESA 200, VESA 200 x 200
 |
View all Westinghouse MT80 ARM20 manuals
Add to My Manuals
Save this manual to your list of manuals |
Page 6 highlights
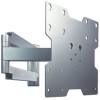
WARNING • If screws don't get three complete turns in the screen inserts or if screws bottom out and adapter plate is still not tightly secured, damage may occur to screen or product may fail. Contact customer care for correct hardware to use. Note: To add security, order ACC 919 for security screws. Refer to ACC 919 instruction sheet for installing security screws. 2 To prevent scratching the screen, set a cloth on a flat, level surface that will support the weight of the screen. Place screen face side down. Find the VESA® hole pattern (VESA 200 can be horizontal or vertical) as shown in figures 2.1 through 2.3, and attach adapter plate to screen accordingly. Verify that all holes are properly aligned, and then tighten screws using security allen wrench (D). For additional screen compatibility please refer to the Westinghouse Décor wall mount list on out website at www.westinghousedigital.com. VESA 100 VESA 200 VESA 200 x 200 fig. 2.1 fig. 2.2 fig. 2.3 6 of 10 ISSUED: 01-17-06 SHEET #: 202-9094-1
-
 1
1 -
 2
2 -
 3
3 -
 4
4 -
 5
5 -
 6
6 -
 7
7 -
 8
8 -
 9
9 -
 10
10
 |
 |
