Westinghouse MT80 ARM20 Installation Instructions - Page 9
screen to fall.
 |
View all Westinghouse MT80 ARM20 manuals
Add to My Manuals
Save this manual to your list of manuals |
Page 9 highlights
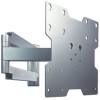
WARNING • Do not remove screw or loosen screw until it is no longer engaged with the mount. Doing so may cause the screen to fall. 5 If more or less tension is desired in the arm pivot points, do the following: • To increase tension, turn tension screw(s) clockwise with 3/16" allen wrench (D). • To reduce tension, turn tension screw(s) counter-clockwise with allen wrench. Do not turn more than half a turn. TENSION SCREWS 9 of 10 ISSUED: 01-17-06 SHEET #: 202-9094-1
-
 1
1 -
2
-
3
-
 4
4 -
 5
5 -
 6
6 -
 7
7 -
 8
8 -
 9
9 -
 10
10
 |
 |

9 of 10
ISSUED: 01-17-06
SHEET #: 202-9094-1
If more or less tension is desired in the arm pivot points, do the following:
•
To increase tension, turn tension screw(s) clockwise with 3/16" allen wrench (
D
).
•
To reduce tension, turn tension screw(s) counter-clockwise with allen wrench.
Do not turn more than half a turn.
5
TENSION SCREWS
•
Do not remove screw or loosen screw until it is no longer engaged with the mount. Doing so may cause the
screen to fall.
WARNING