Whirlpool DU1055XTVB Installation Instructions - Page 12
Determine Cabinet Opening
 |
UPC - 883049128108
View all Whirlpool DU1055XTVB manuals
Add to My Manuals
Save this manual to your list of manuals |
Page 12 highlights
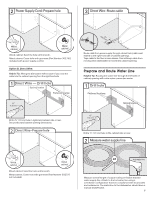
Wiring configuration Power supply wire: white black ground wire Terminal box wire: white black ground connector If needed, see website for animated representation of this step. Visit www.whirlpool.com under FAQ tab. 4 Power Cord-Secure cord on conduit connector Tighten strain relief screws to secure cord. 5 Power Cord-Reinstall terminal box cover Determine Cabinet Opening 1 Measure cabinet opening Measure height of cabinet opening from underside of countertop to floor where dishwasher will be installed (you will need to measure the lowest point on the underside of the countertop and the highest point on the floor). Refer to "Dishwasher Height Adjustment Chart" for wheel position and the number of turns needed. Dishwasher Height Adjustment Chart Cabinet opening height Wheel position Number of turns on front leg Removed All the way up 34" (86.4 cm) 1 10 (87.0 cm) 2 5 3 0 NOTE: If the minimum cabinet opening height is less than 34" (86.4 cm), the rear wheels can be removed for additional clearance. This will allow the dishwasher to fit into a 33⁷⁄₈" (86 cm) high cabinet opening, but the dishwasher will be more difficult to move. (Measurements are approximate. Wheels and legs are preset at the factory for 34¹⁄₂" [87.6" cm].) 2 Adjust wheels and legs Place wires inside terminal box. Insert tabs on left side of cover. Make sure wires are tucked inside box. Close cover ensuring wires are not pinched. Use ¹⁄₄" nut driver and previously removed screw to secure cover. NOTE: Do not plug into outlet until instructed. 12 3 2 1 Turn both leveler legs to the same height. Put wheels in the required position determined from "Dishwasher Height Adjustment Chart." (To change wheel position, use a flat-blade screwdriver to pop out the wheel, then snap into the new position.)
-
 1
1 -
2
-
3
-
4
-
5
-
6
-
 7
7 -
 8
8 -
 9
9 -
 10
10 -
 11
11 -
 12
12 -
 13
13 -
 14
14 -
 15
15 -
 16
16 -
 17
17 -
18
-
19
-
20
-
21
-
22
-
23
-
24
-
25
-
26
-
27
-
28
-
29
-
30
-
31
-
32
-
33
-
34
-
35
-
36
-
37
-
38
-
39
-
40
 |
 |
