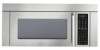
Whirlpool JMV8186AAS Owners Manual - Page 11
Setting and Using the Custom Button, Using the Kitchen Timer, Using the Pause/Cancel Button, Using
 |
View all Whirlpool JMV8186AAS manuals
Add to My Manuals
Save this manual to your list of manuals |
Page 11 highlights
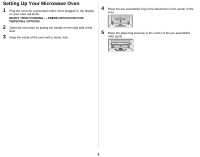
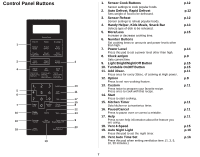
Setting and Using the Custom Button The Custom button memorizes the time and power setting for a particular food. Programming the Custom button 1 Press the Custom button. Press the button twice to delete the previous Custom setting. The display shows: ENTER COOKING TIME AND POWER 2 Use the Number buttons to enter the amount of cooking time. The display will show the amount of time you have set. 3 Press the Power Level button and use the Number buttons to enter the power level. The display will show the power level you have set. You can set the power level from 0 to 9. 1 = Warm 2 = Low 3 = Defrost 4 = Medium Low 5 = Medium 6 = Simmer 7 = Medium High 8 = Reheat 9 = Sauté 0 = High 4 Press the Custom button again. The display will read CUSTOM RECIPE SAVED. Using the Custom button Press the Custom button, then press Start button. You can check the power level while cooking is in progress by pressing the Power Level button. Using the Kitchen Timer 1 Use the Number buttons to set the length of time you want the timer to run. 2 Press the Kitchen Timer button. 3 The display counts down and beeps when the time has elapsed. 4 To cancel timer setting: Press Pause/Cancel button twice. Using the Pause/Cancel Button The Pause/Cancel button allows you to clear instructions you have entered. It also allows you to pause the oven's cooking cycle, so that you can check the food. • To pause the oven during cooking: press Pause/Cancel button once. To restart, press Start button. • To stop cooking, erase instructions, and return the oven display to the time of day: press Pause/Cancel button twice. • To clear instructions you have just entered: press Pause/Cancel button once, then re-enter the instructions. • To cancel a timer setting: press Pause/Cancel button once. Using the Help Button Your microwave offers helpful instructions for many procedures. 1 When you need feature information and helpful hints, press the Help button and then press the button that you want to get information on. Help information is available in 3 languages (English, French and Spanish). Using the Add 30sec. Button This button offers a convenient way to heat food in 30 sec. increments at the High power level. 1 Press the Add 30sec. button once for each additional 30 sec. you want to increase your cooking time by. For example, press it twice for one minute. The time will display, and the oven starts automatically. 2 Each time the Add 30sec. button is pressed 30sec. will be added to the time counting down. 11
-
 1
1 -
2
-
3
-
4
-
5
-
 6
6 -
 7
7 -
 8
8 -
 9
9 -
 10
10 -
 11
11 -
 12
12 -
 13
13 -
 14
14 -
 15
15 -
 16
16 -
17
-
18
-
19
-
20
-
21
-
22
-
23
-
24
-
25
-
26
-
27
-
28
-
29
-
30
-
31
-
32
-
33
-
34
-
35
-
36
-
37
-
38
-
39
-
40
-
41
-
42
-
43
-
44
-
45
-
46
-
47
-
48
-
49
-
50
-
51
-
52
-
53
-
54
-
55
-
56
-
57
-
58
-
59
-
60
-
61
-
62
-
63
-
64
-
65
-
66
-
67
-
68
-
69
-
70
-
71
-
72
-
73
-
74
-
75
-
76
-
77
-
78
-
79
-
80
-
81
-
82
-
83
-
84
-
85
-
86
-
87
-
88
-
89
-
90
-
91
-
92
-
93
-
94
-
95
-
96
-
97
-
98
-
99
-
100
-
101
-
102
-
103
-
104
 |
 |
