Whirlpool LRF4001RY Use and Care Manual - Page 10
FABRIC FRESHENER CARE, Cleaning the Fabric Freshener - fabric freshener system
 |
View all Whirlpool LRF4001RY manuals
Add to My Manuals
Save this manual to your list of manuals |
Page 10 highlights
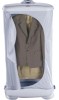
NOTE: The cup you receive with your Fabric Freshener may vary in design from what is shown here. IMPORTANT: To ensure proper performance, always keep bag closed while Fabric Freshener is operating. 4. Press and hold the ON/OFF button for approximately 1 second while the Start/Steaming indicator light glows. The freshening cycle will begin. Cycle cup for distilled water only 2. Replace cycle cup into cup receptacle. Press down on the cycle cup to be sure cycle cup is firmly in place. 3. Close bag zipper completely. NOTES: s Sounds from the internal fan are normal during operation. s The temperature and humidity in the immediate surrounding area may increase slightly. Start/Steaming, Gentle Drying, Cooling, and Complete indicator lights will light as each cycle progresses through each stage. Once the Complete indicator light is lit, the cycle is complete and you may remove your items. NOTE: After a period of inactivity, the Complete indicator light will turn off and the Fabric Freshener will go into a sleep mode until the ON/OFF button is pushed again. Stop Fabric Freshener To stop the Fabric Freshener and reset cycle: s Press and hold the ON/OFF button for approximately 1 second, or until all indicator lights are off. FABRIC FRESHENER CARE When you have finished using your Fabric Freshener, you may wish to close and store the Fabric Freshener. Cleaning the Fabric Freshener 1. Unplug Fabric Freshener from outlet. 2. Remove any garment(s) that may remain in Fabric Freshener. 3. Clean sensors with a damp cloth. WARNING A Electrical Shock Hazard Disconnect power before servicing. Replace all parts and panels before operating. Failure to do so can result in death or electrical shock. A. Sensors located on floor of Fabric Freshener on either side of exhaust grille 4. Clean surfaces with a damp cloth. NOTE: Do not use chemical or abrasive cleaners. 10
-
 1
1 -
2
-
3
-
4
-
 5
5 -
 6
6 -
 7
7 -
 8
8 -
 9
9 -
 10
10 -
 11
11 -
 12
12 -
 13
13 -
 14
14 -
 15
15 -
16
-
17
-
18
-
19
-
20
-
21
-
22
-
23
-
24
-
25
-
26
-
27
-
28
-
29
-
30
-
31
-
32
-
33
-
34
-
35
-
36
-
37
-
38
-
39
-
40
 |
 |
