Whirlpool SF462LXS Use and Care Manual - Page 20
To Replace
 |
View all Whirlpool SF462LXS manuals
Add to My Manuals
Save this manual to your list of manuals |
Page 20 highlights
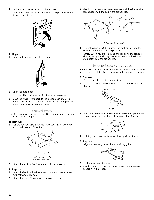
4. Lift the oven door while holding both sides. Continue to push the oven door closed and pull it away from the oven door frame. 3. Slowly push the drawer into the range until the drawer side rails engage with the gap in the drawer glides. \ \ To Replace: 1. Insert both hanger arms into the door. A. Engage drawer glide Once the drawer is fully engaged on both sides, slide the drawer back into the closed position. NOTE: When you are removing and replacing the storage drawer, a slight push may be needed to move the drawer stop notch past the drawer glides. 2= Open the oven door. You should hear a "click" as the door is set into place. 3. Move the hinge levers back to the locked position. Check that the door is free to open and close. If it is not, repeat the removal and installation procedures. The storage drawer can be removed. Before removing, make sure drawer is cool and empty. To Remove: 1. Pull the storage drawer straight back past the drawer stop notch and the end of the side rails. Remove all items from inside the warming drawer, and allow the unit to cool completely before attempting to remove the drawer. To Remove: 1. Open drawer to its fully open position. 2. Locate the black triangle-shaped tabs on both sides of the drawer. A A. Tab Press the tab down on the right side, and lift tab up on the left side at the same time, then pull drawer out another inch. 4. Holding the drawer by its sides, slowly pull it all the way out. To Replace: 1. Align the drawer glides with the receiving guides. A. Drawer stop notch B. End of side rail 2. Lift up the back of the drawer and pull the drawer out. To Replace: 1. Lift up the back of the drawer and place it inside the range in its fully forward position. 2. Lift up the front of the drawer to a level position. 2. Push drawer in all the way. 3. Gently open and close the drawer to ensure it is seated properly on the slides. 20
-
 1
1 -
2
-
3
-
4
-
5
-
6
-
7
-
8
-
9
-
10
-
11
-
12
-
13
-
14
-
 15
15 -
 16
16 -
 17
17 -
 18
18 -
 19
19 -
 20
20 -
 21
21 -
 22
22 -
 23
23 -
 24
24
 |
 |