Whirlpool WDF518SAHW Installation Instructions - Page 18
Connect Water Line To House
 |
View all Whirlpool WDF518SAHW manuals
Add to My Manuals
Save this manual to your list of manuals |
Page 18 highlights
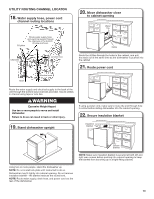
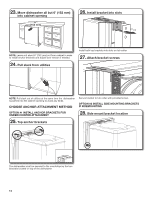
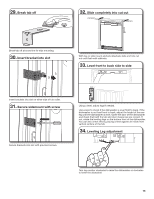
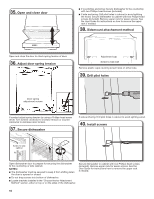
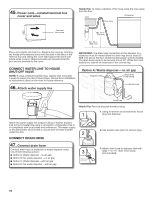
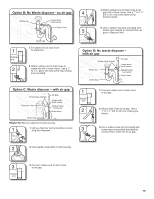
45. Power cord-reinstall terminal box cover and wires Terminal box cover Helpful Tip: To reduce vibration of the hose, keep the hose away from the floor. Drain hose Place wires inside terminal box. Replace the cover by inserting the hooks of the terminal cover into the slots in the floor of the terminal box and sliding the cover tight against the back wall where wires come in. Make sure wires are tucked inside the box and not pinched by the cover. IMPORTANT: The drain hose connection to the disposer or a waste tee must be made before the drain trap and at least 20" (508 mm) above the floor where the dishwasher will be installed. The drain hoes needs to be secured min of 30" off the floor and fastened to cabinet or underside of the counter top. CONNECT WATER LINE TO HOUSE SHUT-OFF VALVE NOTE: If using a flexible braided hose, replace inlet hose after 5 years to reduce the risk of hose failure. Record hose installation or replacement dates on the hose for future reference. 46. Attach water supply line Option A: Waste disposer-no air gap Disposer inlet Large drain hose clamp Drain hose Drain trap Helpful Tip: Remove disposer knockout plug. 1. Using a hammer and screwdriver, knock 1 plug into disposer. Attach the water supply line (copper tubing or flexible braided line) to the hot water line using a connection configuration that is in compliance with local codes and ordinances. The water supply to the dishwasher should have a manual shut-off valve located under the sink. 2 CONNECT DRAIN HOSE 47. Connect drain hose Connect drain hose to waste tee or waste disposer using one of the following options: 3 ■■ Option A: Waste disposer - no air gap ■■ Option B: No waste disposer - no air gap ■■ Option C: Waste disposer - with air gap ■■ Option D: No waste disposer - with air gap 2. Use needle-nose pliers to remove plug. 3. Attach drain hose to disposer inlet with large 1" to 11/2" drain hose clamp (not provided). 18
-
 1
1 -
2
-
3
-
4
-
5
-
6
-
7
-
8
-
9
-
10
-
11
-
12
-
 13
13 -
 14
14 -
 15
15 -
 16
16 -
 17
17 -
 18
18 -
 19
19 -
 20
20 -
 21
21 -
 22
22 -
 23
23 -
24
-
25
-
26
-
27
-
28
-
29
-
30
-
31
-
32
-
33
-
34
-
35
-
36
-
37
-
38
-
39
-
40
-
41
-
42
-
43
-
44
-
45
-
46
-
47
-
48
-
49
-
50
-
51
-
52
-
53
-
54
-
55
-
56
-
57
-
58
-
59
-
60
 |
 |
