Whirlpool WDT550SAPB Owners Manual - Page 29
T-Gasket Installation (on some models), Check Operation, If Dishwasher Does Not Operate
 |
View all Whirlpool WDT550SAPB manuals
Add to My Manuals
Save this manual to your list of manuals |
Page 29 highlights
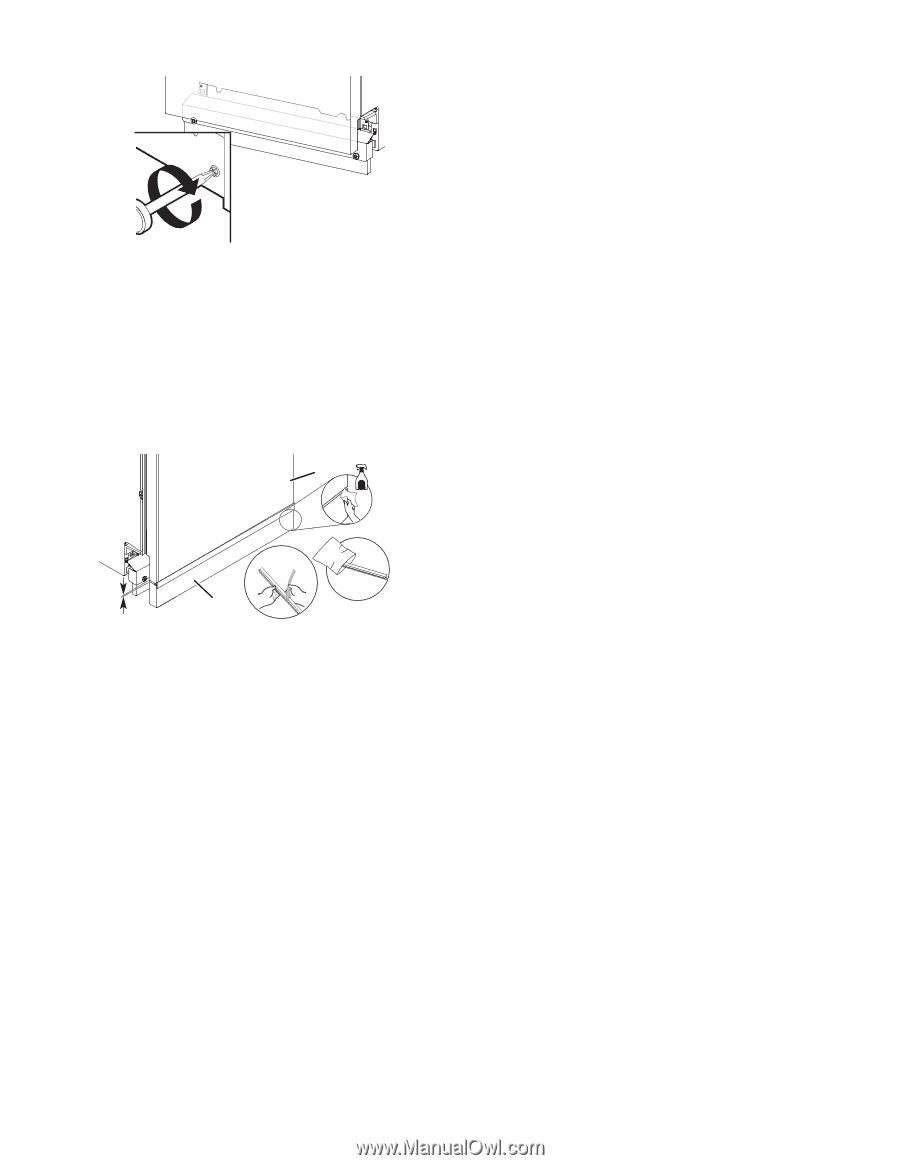
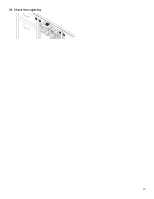
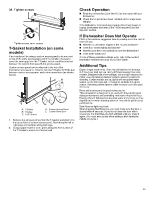
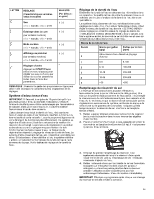
38. Tighten screws Tighten access panel screws. T-Gasket Installation (on some models) If an installer will be using a custom access panel to be mounted on top of the unit's access panel and if the installer chooses to cover the seam gap then the T-Gasket bottom could be attached between the custom front panel & the access panel. Custom access panel can be attached to the top of the dishwasher access panel. Installer can use T-Gasket to fill the gap between custom access panel and custom panel door (as shown below). E A B C D A. T-Gasket B. Polybag C. 3/16" (5 mm) D. Custom Access Panel E. Custom Panel Door 1. Remove the adhesive strips from the T-Gasket and attach it to the top surface of custom access panel. Start along the left or right edge and continue along that edge. 2. Using a paper towel or cloth, press along the front surface of the T-Gasket to ensure it is flushed well. Check Operation � Read the dishwasher Quick Start Guide that came with your dishwasher. � Check that all parts have been installed and no steps were skipped. If the dishwasher is not working properly, disconnect power or unplug dishwasher and refer to the "If Dishwasher Does Not Operate" section. If Dishwasher Does Not Operate First try the solutions suggested here to possibly avoid the cost of a service call. � Has the circuit breaker tripped or the house fuse blown? � Is the door closed tightly and latched? � Has the cycle been set correctly to start the dishwasher? � Is the water turned on? If none of these possible solutions work, refer to the contact information referenced in your Quick Start Guide. Additional Tips Expect longer wash times. Your new dishwasher will average 2-5 hours per load but use nearly 40% less energy than older models. Designed with a low-wattage, low-energy-consumption motor, your dishwasher washes longer to ensure exceptional cleaning. Certain models are equipped with an optical water sensor, so the first cycle will run longer to calibrate the optical sensor. Selecting certain options could increase cycle time past 3.5 hours. Rinse aid is necessary for good drying results: This dishwasher is designed to be used with rinse aid for good drying performance and controlling hard-water-deposit buildup. Energy-efficient dishwashers use less water and energy, so they depend on the water sheeting action of rinse aid for good drying performance. Start/Resume light may flash: When pressing Start/Resume, you must make sure the door is closed within 4 seconds. If you do not close the door within 4 seconds, the Start/Resume light will flash until you press it again. (You must also do this when adding a dish during the middle of a cycle.) 29
-
 1
1 -
2
-
3
-
4
-
5
-
6
-
7
-
8
-
9
-
10
-
11
-
12
-
13
-
14
-
15
-
16
-
17
-
18
-
19
-
20
-
21
-
22
-
23
-
 24
24 -
 25
25 -
 26
26 -
 27
27 -
 28
28 -
 29
29 -
 30
30 -
 31
31 -
 32
32 -
 33
33 -
 34
34 -
35
-
36
-
37
-
38
-
39
-
40
-
41
-
42
-
43
-
44
-
45
-
46
-
47
-
48
-
49
-
50
-
51
-
52
-
53
-
54
-
55
-
56
-
57
-
58
-
59
-
60
-
61
-
62
-
63
-
64
 |
 |