Whirlpool WDT705PAK Owners Manual - Page 14
Install Door Handle on some, models
 |
View all Whirlpool WDT705PAK manuals
Add to My Manuals
Save this manual to your list of manuals |
Page 14 highlights
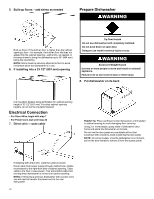
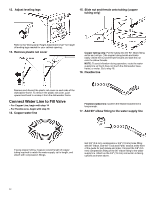
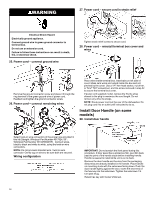
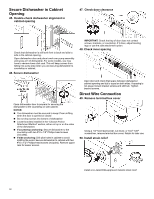
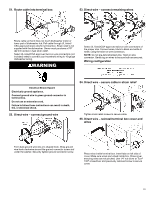
WARNING 27. Power cord - secure cord in strain relief Electrical Shock Hazard Electrically ground appliance. Connect ground wire to green ground connector in terminal box. Do not use an extension cord. Failure to follow these instructions can result in death, fire, or electrical shock. 25. Power cord - connect ground wire Tighten strain relief screws to secure cord. 28. Power cord - reinstall terminal box cover and wires Remove the ground connector screw and place it through the ring terminal of the green ground wire of power cord. Reattach and tighten the ground connector screw. 26. Power cord - connect remaining wires Place wires inside terminal box. Insert tabs on left side of cover. Make sure wires are tucked inside the box and not pinched by the cover. Use a 1/4" hex-head socket, nut driver, or Torx® T20® screwdriver, and the screw removed in step 22 to secure the terminal box cover. If power cord supplied model, remove the first tie strap closest to the plug to maximize the cord length. Do not remove any other tie straps. NOTE: Route power cord out the rear of the dishwasher. Do not plug cord into an outlet until instructed to do so. Install Door Handle (on some models) 29. Install door handle Select twist-on wire connectors of the proper size provided in this kit (Straight: Whirlpool Part Number 4317824, 90°: Whirlpool Part Number W10278923RP) . Connect wires, black to black and white to white, using the twist-on wire connectors. NOTE: Do not pre-twist stranded wire. Twist on wire connector. Gently tug on wires to be sure both are secured. Wiring configuration IMPORTANT: Do not scratch the front panel during this procedure. If door panel has a protective film, peel film back past the point of the handle studs before installing handle. Handle is easiest to install while unit is on its back. Remove the door handle and hex key from the packaging. Setscrews are already installed in the handle. Place handle on mounting studs with the setscrews facing down. Push the door handle tightly against the door. Insert the short end of the hex key into the setscrews. Tighten the setscrews 1/4 turn past snug. Retain hex key with Owner's Manual. 14
-
 1
1 -
2
-
3
-
4
-
5
-
6
-
7
-
8
-
 9
9 -
 10
10 -
 11
11 -
 12
12 -
 13
13 -
 14
14 -
 15
15 -
 16
16 -
 17
17 -
 18
18 -
 19
19 -
20
-
21
-
22
-
23
-
24
-
25
-
26
-
27
-
28
-
29
-
30
-
31
-
32
-
33
-
34
-
35
-
36
-
37
-
38
-
39
-
40
-
41
-
42
-
43
-
44
-
45
-
46
 |
 |
