Whirlpool WET3300XQ Installation Guide - Page 20
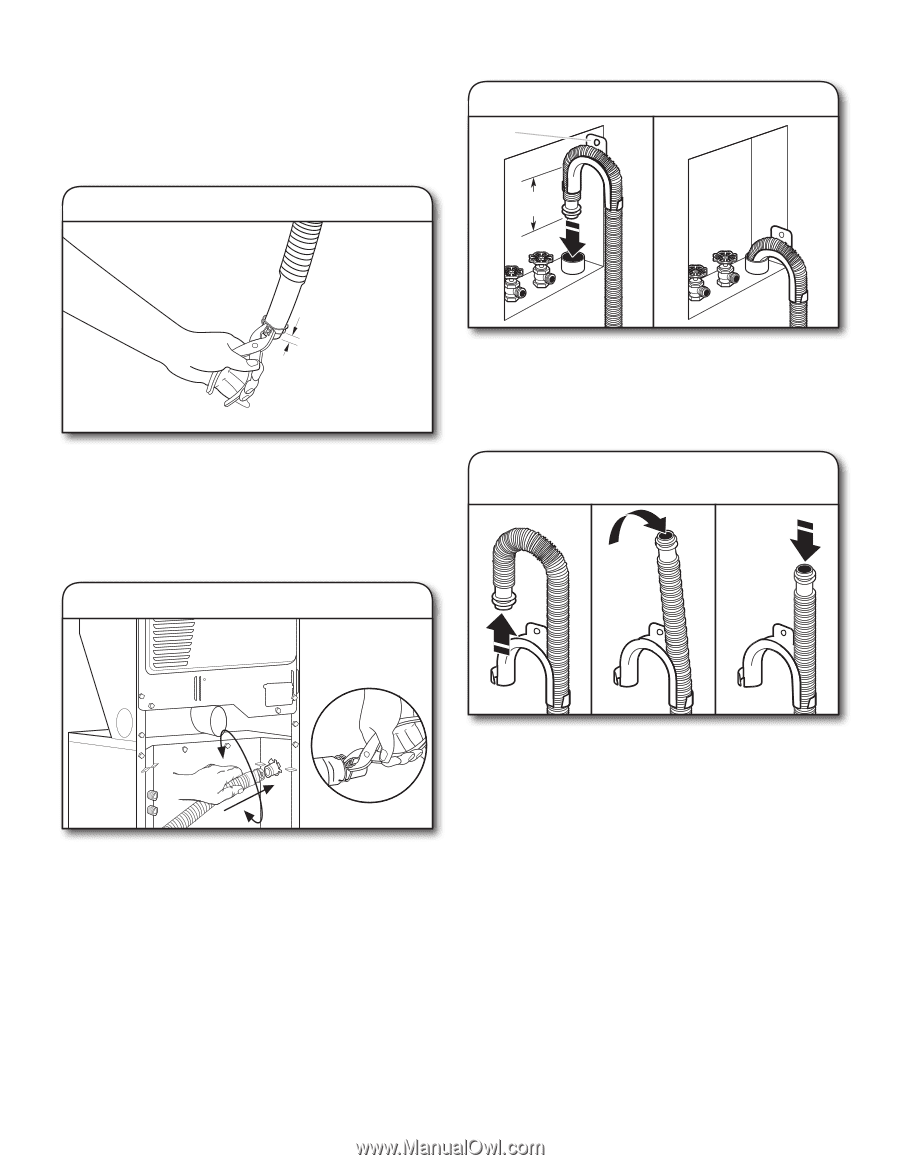
Connect Drain Hose
 |
View all Whirlpool WET3300XQ manuals
Add to My Manuals
Save this manual to your list of manuals |
Page 20 highlights
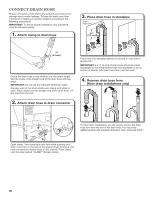
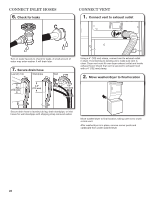
Connect Drain Hose Proper connection of the drain hose protects your floors from damage due to water leakage. To keep the drain hose from coming off or leaking, it must be installed according to the following instructions: IMPORTANT: To ensure proper installation, this procedure must be followed exactly. 1. Attach clamp to drain hose 3. Place drain hose in standpipe Drain hose form 4.5" (113 mm) ¼" (6.4 mm) Check the drain hose to see whether it is the proper length. Wet the inside of the straight end of the drain hose with tap water. IMPORTANT: Do not use any lubricant other than water. Squeeze ears of the silver double-wire clamp with pliers to open. Place clamp over the straight end of the drain hose 1/4" (6.4 mm) from the end. Place hose into standpipe (shown in picture) or over side of laundry tub. IMPORTANT: 4.5" (113 mm) of drain hose should be inside standpipe; do not force excess hose into standpipe or lay on bottom of laundry tub. Drain hose form must be used. 4. Remove drain hose form (floor drain installations only) 2. Attach drain hose to drain connector For floor drain installations, you will need to remove the drain hose form from the end of the drain hose. You may need additional parts with separate directions. See "Tools and Parts." Open clamp. Twist hose back and forth while pushing onto drain connector on the side of the washer/dryer. Continue until hose contacts the ribbed stops on the cabinet. Place clamp over the area marked "CLAMP." Release clamp. 20
-
 1
1 -
2
-
3
-
4
-
5
-
6
-
7
-
8
-
9
-
10
-
11
-
12
-
13
-
14
-
 15
15 -
 16
16 -
 17
17 -
 18
18 -
 19
19 -
 20
20 -
 21
21 -
 22
22 -
 23
23 -
 24
24 -
 25
25 -
26
-
27
-
28
-
29
-
30
-
31
-
32
-
33
-
34
-
35
-
36
-
37
-
38
-
39
-
40
-
41
-
42
-
43
-
44
 |
 |