Whirlpool WET3300XQ Installation Guide - Page 3
Installation Requirements - parts
 |
View all Whirlpool WET3300XQ manuals
Add to My Manuals
Save this manual to your list of manuals |
Page 3 highlights
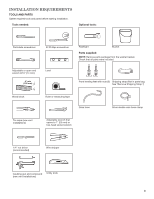
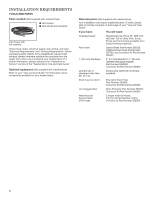
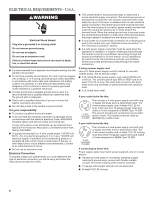
installation requirements Tools and Parts Gather required tools and parts before starting installation. Tools needed: Optional tools: Flat-blade screwdriver #2 Phillips screwdriver Adjustable or open-end wrench 9/16" (14 mm) 4" min (102 mm) Level Flashlight Bucket Parts supplied: NOTE: Remove parts package from the washer basket. Check that all parts were included. Front leveling feet with nuts (2) Shipping strap (Not in parts bag. See "Remove Shipping Strap.") Wood block Ruler or measuring tape Drain hose Silver double-wire hose clamp Tin snips (new vent installations) Adjustable wrench that opens to 1" (25 mm) or hex-head socket wrench 1/4" nut driver (recommended) Wire stripper Caulking gun and compound (new vent installations) Utility knife 3
-
 1
1 -
 2
2 -
 3
3 -
 4
4 -
 5
5 -
 6
6 -
 7
7 -
 8
8 -
 9
9 -
10
-
11
-
12
-
13
-
14
-
15
-
16
-
17
-
18
-
19
-
20
-
21
-
22
-
23
-
24
-
25
-
26
-
27
-
28
-
29
-
30
-
31
-
32
-
33
-
34
-
35
-
36
-
37
-
38
-
39
-
40
-
41
-
42
-
43
-
44
 |
 |
