Xerox 6400X WorkCentre 6400 System Administrator Guide - Page 59
Authentication Using a Card Reader System, Setting Up Authentication Using Xerox Secure Access - 12
 |
UPC - 095205743715
View all Xerox 6400X manuals
Add to My Manuals
Save this manual to your list of manuals |
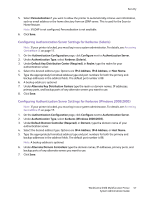
Page 59 highlights
Security Authentication Using a Card Reader System Setting Up Authentication Using Xerox Secure Access Before you begin: • Enable Secure HTTP (SSL). For details, see Enabling HTTP on page 43. • Enable the Authentication & Authorization Configuration Web Service. For details, see Authentication on page 54. • Install the Xerox Secure Access authentication server and configure with user accounts. Refer to the authentication server documentation for help. Note: Accounts created on the Xerox Secure Access authentication server must match accounts stored in the printer's local database or in another network authentication server. • Connect and configure your card reader. To configure authentication using Xerox Secure Access: Note: If your printer is locked, you must log in as a system administrator. For details, see Accessing CentreWare IS on page 17. 1. In CentreWare IS, click Properties > Security > Access Rights > Setup. The Step 1 of 3 window displays. 2. If this is the first time you have configured authentication, click Next otherwise, click Edit Methods. 3. Under Device User Interface Authentication, select Xerox Secure Access. 4. Under Web User Interface Authentication, select Locally on the Device (Internal Database) or Remotely on the Network to specify how the printer will validate the user's rights to access CentreWare IS. 5. If a user normally authenticates at the control panel with a card reader, you must specify a method for the printer to authenticate users who access CentreWare IS from their computer. If you select Remotely on the Network, you must configure a network authentication server. 6. Under Authorization, select Locally on the Device (Internal Database), or Remotely on the Network. 7. Click Next. 8. Click Configure next to Device User Interface Authentication. 9. Configure the Remote Server. For instructions, refer to the information provided with your server hardware. After the server is configured, the server communicates with the printer and automatically completes the configuration process. 10. If required, click Manually Configure to manually configure communication, personalize instructional windows, and review accounting options. For details, see Manually Configuring Control Panel Authentication on page 60. 11. If you selected Remotely on the Network for the Web User Interface Authentication method, click Configure next to Web User Interface Authentication. Configure the authentication server settings. For details, seeNetwork Authentication on page 56. 12. Click Finish. WorkCentre 6400 Multifunction Printer 59 System Administrator Guide
-
 1
1 -
2
-
3
-
4
-
5
-
6
-
7
-
8
-
9
-
10
-
11
-
12
-
13
-
14
-
15
-
16
-
17
-
18
-
19
-
20
-
21
-
22
-
23
-
24
-
25
-
26
-
27
-
28
-
29
-
30
-
31
-
32
-
33
-
34
-
35
-
36
-
37
-
38
-
39
-
40
-
41
-
42
-
43
-
44
-
45
-
46
-
47
-
48
-
49
-
50
-
51
-
52
-
53
-
 54
54 -
 55
55 -
 56
56 -
 57
57 -
 58
58 -
 59
59 -
 60
60 -
 61
61 -
 62
62 -
 63
63 -
 64
64 -
65
-
66
-
67
-
68
-
69
-
70
-
71
-
72
-
73
-
74
-
75
-
76
-
77
-
78
-
79
-
80
-
81
-
82
-
83
-
84
-
85
-
86
-
87
-
88
-
89
-
90
-
91
-
92
-
93
-
94
-
95
-
96
-
97
-
98
-
99
-
100
-
101
-
102
-
103
-
104
-
105
-
106
-
107
-
108
-
109
-
110
-
111
-
112
-
113
-
114
-
115
-
116
-
117
-
118
-
119
-
120
-
121
-
122
-
123
-
124
-
125
-
126
-
127
-
128
-
129
-
130
-
131
-
132
-
133
-
134
-
135
-
136
-
137
-
138
-
139
-
140
-
141
-
142
-
143
-
144
-
145
-
146
-
147
-
148
-
149
-
150
-
151
-
152
-
153
-
154
-
155
-
156
-
157
-
158
-
159
-
160
-
161
-
162
-
163
-
164
-
165
-
166
-
167
-
168
-
169
-
170
-
171
-
172
-
173
-
174
-
175
-
176
-
177
-
178
-
179
-
180
-
181
-
182
-
183
-
184
 |
 |