Xerox 7760GX Advanced Features Guide - Page 50
Quick CD-ROM Install Steps, Other Methods of Installation, PhaserPort Software
 |
UPC - 095205225396
View all Xerox 7760GX manuals
Add to My Manuals
Save this manual to your list of manuals |
Page 50 highlights
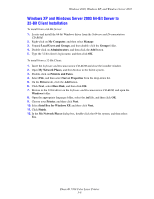
Windows 98 SE Quick CD-ROM Install Steps To use quick CD-ROM installation: 1. Insert the Software and Documentation CD-ROM into the computer's CD-ROM drive. If the installer does not launch, do the following: a. Click Start, and then click Run. b. In the Run window, type: :\INSTALL.EXE. 2. Select your desired language from the list. 3. Select Install Printer Driver. 4. Click I Agree to accept the Xerox Software License Agreement. 5. In the Select Printer dialog box, the default Use Walk-Up Technology (recommended for network printers) is selected. Click Next. 6. Follow the Use Walk-Up Technology instructions displayed. 7. Click Exit Program. Note: If the Walk-Up Technology dialog box remains onscreen after you have completed Steps 1-6, click the Cancel button, and then click Select from the following discovered printers. Follow the onscreen prompts to complete the installation procedure. See also: Knowledge Base at www.xerox.com/office/7760support Other Methods of Installation Install your printer on a Windows 98 SE network using PhaserPort software. PhaserPort Software The Windows installer installs PhaserPort for Windows (for those installations using PostScript drivers). PhaserPort for Windows is a Xerox print monitor for printing over Windows 98 SE TCP/IP peer-to-peer networks. PhaserPort can be used to add or remove TCP/ IP ports. Note: PhaserPort is the preferred utility for PostScript installations. Adding a Port To add a printer port: 1. Open Printer Properties for the printer you would like to attach to the new TCP/IP port. 2. Click Start, click Settings, and then click Printers. 3. Right-click the printer to be attached to the new TCP/IP port, and then click Properties. 4. Click the Details tab, and then click the Add Port button. Phaser® 7760 Color Laser Printer 3-12
-
 1
1 -
2
-
3
-
4
-
5
-
6
-
7
-
8
-
9
-
10
-
11
-
12
-
13
-
14
-
15
-
16
-
17
-
18
-
19
-
20
-
21
-
22
-
23
-
24
-
25
-
26
-
27
-
28
-
29
-
30
-
31
-
32
-
33
-
34
-
35
-
36
-
37
-
38
-
39
-
40
-
41
-
42
-
43
-
44
-
 45
45 -
 46
46 -
 47
47 -
 48
48 -
 49
49 -
 50
50 -
 51
51 -
 52
52 -
 53
53 -
 54
54 -
 55
55 -
56
-
57
-
58
-
59
-
60
-
61
-
62
-
63
-
64
-
65
-
66
-
67
-
68
-
69
-
70
-
71
-
72
-
73
-
74
-
75
-
76
-
77
-
78
-
79
-
80
-
81
-
82
-
83
-
84
-
85
-
86
-
87
-
88
-
89
-
90
-
91
-
92
-
93
-
94
-
95
-
96
-
97
-
98
-
99
-
100
-
101
-
102
-
103
-
104
-
105
 |
 |