Yamaha 01V Owner's Manual - Page 206
Initializing the 01V, Calibrating the Faders, Initial Settings - factory reset
 |
View all Yamaha 01V manuals
Add to My Manuals
Save this manual to your list of manuals |
Page 206 highlights
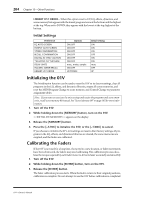
204 Chapter 15-Other Functions LIBRARY LIST ORDER-When this option is set to UP, EQ, effects, dynamics, and scene memory lists appear with the lowest program/scene at the bottom and the highest at the top. When set to DOWN, they appear with the lowest at the top, highest at the bottom. Initial Settings Preference EQ AUTO SCREEN PANPOT AUTO SCREEN STORE CONFIRMATION RECALL CONFIRMATION DIGITAL IN SYNC CAUTION "SELECTED CH" MESSAGE DELAY UNITS INC/DEC SCENE RECALL LIBRARY LIST ORDER Options ON/OFF ON/OFF ON/OFF ON/OFF ON/OFF ON/OFF msec, meter, sample ON/OFF UP/DOWN Initial Setting ON ON ON OFF ON ON msec OFF UP Initializing the 01V The Initialization function can be used to reset the 01V to its factory settings, clear all programs in the EQ, effects, and dynamics libraries, empty all scene memories, and reset the MIDI Program Change to scene memory, and Control Change to parameter assignment tables. Note: If you want to reset just the mix settings and retain the programs and scene memories, recall scene memory 00 instead. See "Scene Memory 00" on page 185 for more information. 1. Turn off the 01V. 2. While holding down the [MEMORY] button, turn on the 01V. appears on the display. 3. Release the [MEMORY] button. 4. Press the [+1/INC] to initialize the 01V, or the [-1/DEC] to cancel. If you choose to initialize the 01V, mix settings are reset to their factory settings, all programs in the EQ, effects, and dynamics libraries are cleared, the scene memories are emptied, and the faders are calibrated. Calibrating the Faders If the 01V is not used for a long time, it's moved to a new location, or fader movements have been obstructed, the faders may need calibrating. The calibration process calculates the torque required by each fader motor to drive its fader accurately and smoothly. 1. Turn off the 01V. 2. While holding down the [ENTER] button, turn on the 01V. 3. Release the [ENTER] button. The fader calibration process starts. When the faders return to their original positions, calibration is complete. Do not attempt to use the 01V before calibration is completed. 01V-Owner's Manual
-
 1
1 -
2
-
3
-
4
-
5
-
6
-
7
-
8
-
9
-
10
-
11
-
12
-
13
-
14
-
15
-
16
-
17
-
18
-
19
-
20
-
21
-
22
-
23
-
24
-
25
-
26
-
27
-
28
-
29
-
30
-
31
-
32
-
33
-
34
-
35
-
36
-
37
-
38
-
39
-
40
-
41
-
42
-
43
-
44
-
45
-
46
-
47
-
48
-
49
-
50
-
51
-
52
-
53
-
54
-
55
-
56
-
57
-
58
-
59
-
60
-
61
-
62
-
63
-
64
-
65
-
66
-
67
-
68
-
69
-
70
-
71
-
72
-
73
-
74
-
75
-
76
-
77
-
78
-
79
-
80
-
81
-
82
-
83
-
84
-
85
-
86
-
87
-
88
-
89
-
90
-
91
-
92
-
93
-
94
-
95
-
96
-
97
-
98
-
99
-
100
-
101
-
102
-
103
-
104
-
105
-
106
-
107
-
108
-
109
-
110
-
111
-
112
-
113
-
114
-
115
-
116
-
117
-
118
-
119
-
120
-
121
-
122
-
123
-
124
-
125
-
126
-
127
-
128
-
129
-
130
-
131
-
132
-
133
-
134
-
135
-
136
-
137
-
138
-
139
-
140
-
141
-
142
-
143
-
144
-
145
-
146
-
147
-
148
-
149
-
150
-
151
-
152
-
153
-
154
-
155
-
156
-
157
-
158
-
159
-
160
-
161
-
162
-
163
-
164
-
165
-
166
-
167
-
168
-
169
-
170
-
171
-
172
-
173
-
174
-
175
-
176
-
177
-
178
-
179
-
180
-
181
-
182
-
183
-
184
-
185
-
186
-
187
-
188
-
189
-
190
-
191
-
192
-
193
-
194
-
195
-
196
-
197
-
198
-
199
-
200
-
 201
201 -
 202
202 -
 203
203 -
 204
204 -
 205
205 -
 206
206 -
 207
207 -
 208
208 -
 209
209 -
 210
210 -
 211
211 -
212
-
213
-
214
-
215
-
216
-
217
-
218
-
219
-
220
-
221
-
222
-
223
-
224
-
225
-
226
-
227
-
228
-
229
-
230
-
231
-
232
-
233
-
234
-
235
-
236
-
237
-
238
-
239
-
240
-
241
-
242
-
243
-
244
-
245
-
246
-
247
-
248
-
249
-
250
-
251
-
252
-
253
-
254
-
255
-
256
-
257
-
258
-
259
-
260
-
261
-
262
-
263
-
264
-
265
-
266
-
267
-
268
-
269
-
270
-
271
-
272
-
273
-
274
-
275
-
276
-
277
-
278
-
279
-
280
-
281
-
282
-
283
-
284
-
285
-
286
-
287
-
288
-
289
-
290
-
291
-
292
-
293
-
294
-
295
-
296
-
297
-
298
-
299
-
300
-
301
-
302
-
303
 |
 |
