Yamaha AW2400 Owner's Manual - Page 190
Automix Library Operation, About the Automix Library Changing Automix Names
 |
View all Yamaha AW2400 manuals
Add to My Manuals
Save this manual to your list of manuals |
Page 190 highlights
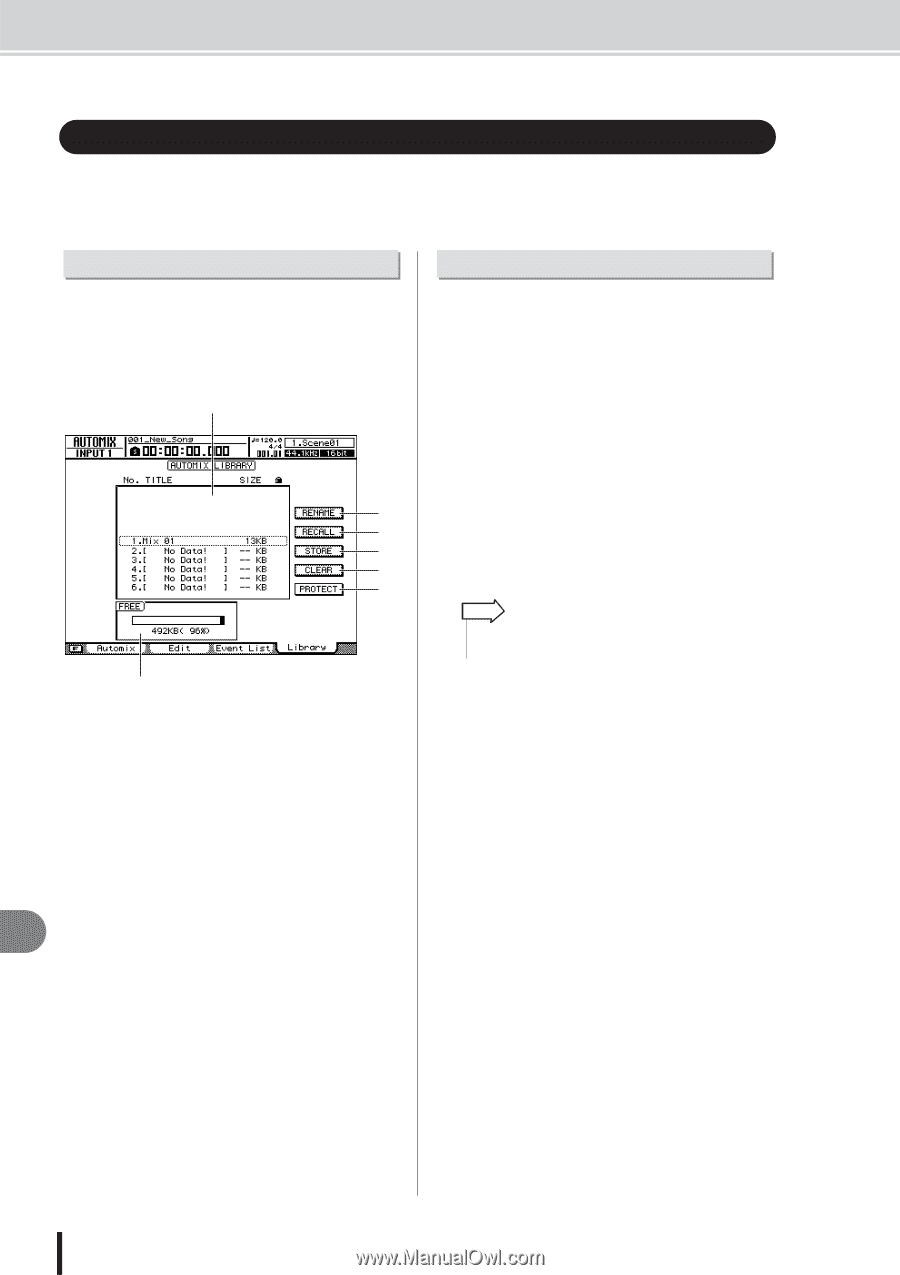
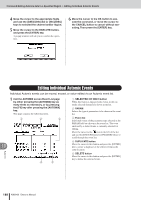
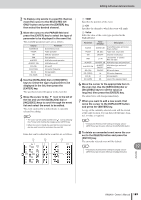
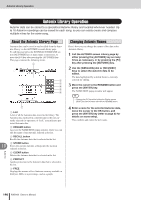
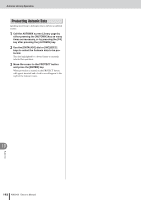
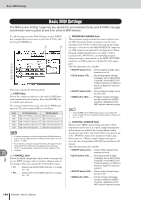
Automix Library Operation Automix Library Operation Automix data can be stored to a specialized Automix library and recalled whenever needed. Up to 16 Automix recordings can be saved for each song, so you can easily create and compare multiple mixes for the same song. Automix About the Automix Library Page Automix data can be saved to and recalled from the Automix library via the AUTOMIX screen Library page. To call this page press the SCENE/AUTOMIX/USB section [AUTOMIX] key as many times as necessary, or press the [F4] key after pressing the [AUTOMIX] key. This page contains the following items. A B C D E F G 1 List A list of all the Automix data stored in the library. The Automix data enclosed in a dotted frame is the one currently selected for operation. A "lock" icon indicates protected Automix data. B RENAME button Accesses the NAME EDIT popup window, where you can edit the name of the Automix selected in the list. C RECALL button Recalls the Automix data that is selected in the list. D STORE button 19 Stores the current Automix settings into the location selected in the list. E CLEAR button Deletes the Automix data that is selected in the list. F PROTECT Applies protection to the Automix data that is selected in the list. G FREE Displays the amount of free Automix memory available in kilobytes (KB), as a percentage, and as a graph. Changing Automix Names Here's how you can change the names of the data in the Automix library. 1 Call the AUTOMIX screen Library page by either pressing the [AUTOMIX] key as many times as necessary, or by pressing the [F4] key after pressing the [AUTOMIX] key. 2 Use the [DATA/JOG] dial or [INC]/[DEC] keys to select the Automix data to be edited. The data highlighted by a dotted frame is currently selected for editing. 3 Move the cursor to the RENAME button and press the [ENTER] key. The NAME EDIT popup window will appear. HINT • Pressing the [F4] key while holding the Display section [SHIFT] key has the same effect as the RENAME button. 4 Enter a name for the selected Automix data, move the cursor to the OK button, and press the [ENTER] key (refer to page 32 for details on name entry). This confirms and enters the new name. 190 AW2400 Owner's Manual
-
 1
1 -
2
-
3
-
4
-
5
-
6
-
7
-
8
-
9
-
10
-
11
-
12
-
13
-
14
-
15
-
16
-
17
-
18
-
19
-
20
-
21
-
22
-
23
-
24
-
25
-
26
-
27
-
28
-
29
-
30
-
31
-
32
-
33
-
34
-
35
-
36
-
37
-
38
-
39
-
40
-
41
-
42
-
43
-
44
-
45
-
46
-
47
-
48
-
49
-
50
-
51
-
52
-
53
-
54
-
55
-
56
-
57
-
58
-
59
-
60
-
61
-
62
-
63
-
64
-
65
-
66
-
67
-
68
-
69
-
70
-
71
-
72
-
73
-
74
-
75
-
76
-
77
-
78
-
79
-
80
-
81
-
82
-
83
-
84
-
85
-
86
-
87
-
88
-
89
-
90
-
91
-
92
-
93
-
94
-
95
-
96
-
97
-
98
-
99
-
100
-
101
-
102
-
103
-
104
-
105
-
106
-
107
-
108
-
109
-
110
-
111
-
112
-
113
-
114
-
115
-
116
-
117
-
118
-
119
-
120
-
121
-
122
-
123
-
124
-
125
-
126
-
127
-
128
-
129
-
130
-
131
-
132
-
133
-
134
-
135
-
136
-
137
-
138
-
139
-
140
-
141
-
142
-
143
-
144
-
145
-
146
-
147
-
148
-
149
-
150
-
151
-
152
-
153
-
154
-
155
-
156
-
157
-
158
-
159
-
160
-
161
-
162
-
163
-
164
-
165
-
166
-
167
-
168
-
169
-
170
-
171
-
172
-
173
-
174
-
175
-
176
-
177
-
178
-
179
-
180
-
181
-
182
-
183
-
184
-
 185
185 -
 186
186 -
 187
187 -
 188
188 -
 189
189 -
 190
190 -
 191
191 -
 192
192 -
 193
193 -
 194
194 -
 195
195 -
196
-
197
-
198
-
199
-
200
-
201
-
202
-
203
-
204
-
205
-
206
-
207
-
208
-
209
-
210
-
211
-
212
-
213
-
214
-
215
-
216
-
217
-
218
-
219
-
220
-
221
-
222
-
223
-
224
-
225
-
226
-
227
-
228
-
229
-
230
-
231
-
232
-
233
-
234
-
235
-
236
-
237
-
238
-
239
-
240
-
241
-
242
-
243
-
244
-
245
-
246
-
247
-
248
-
249
-
250
-
251
-
252
-
253
-
254
-
255
-
256
-
257
-
258
-
259
-
260
-
261
-
262
-
263
-
264
-
265
-
266
-
267
-
268
-
269
-
270
-
271
-
272
-
273
-
274
-
275
-
276
-
277
-
278
-
279
-
280
-
281
-
282
-
283
-
284
-
285
-
286
-
287
-
288
 |
 |