Yamaha AW2400 Owner's Manual - Page 56
Recording on a track, Press the Transport RTZ
 |
View all Yamaha AW2400 manuals
Add to My Manuals
Save this manual to your list of manuals |
Page 56 highlights
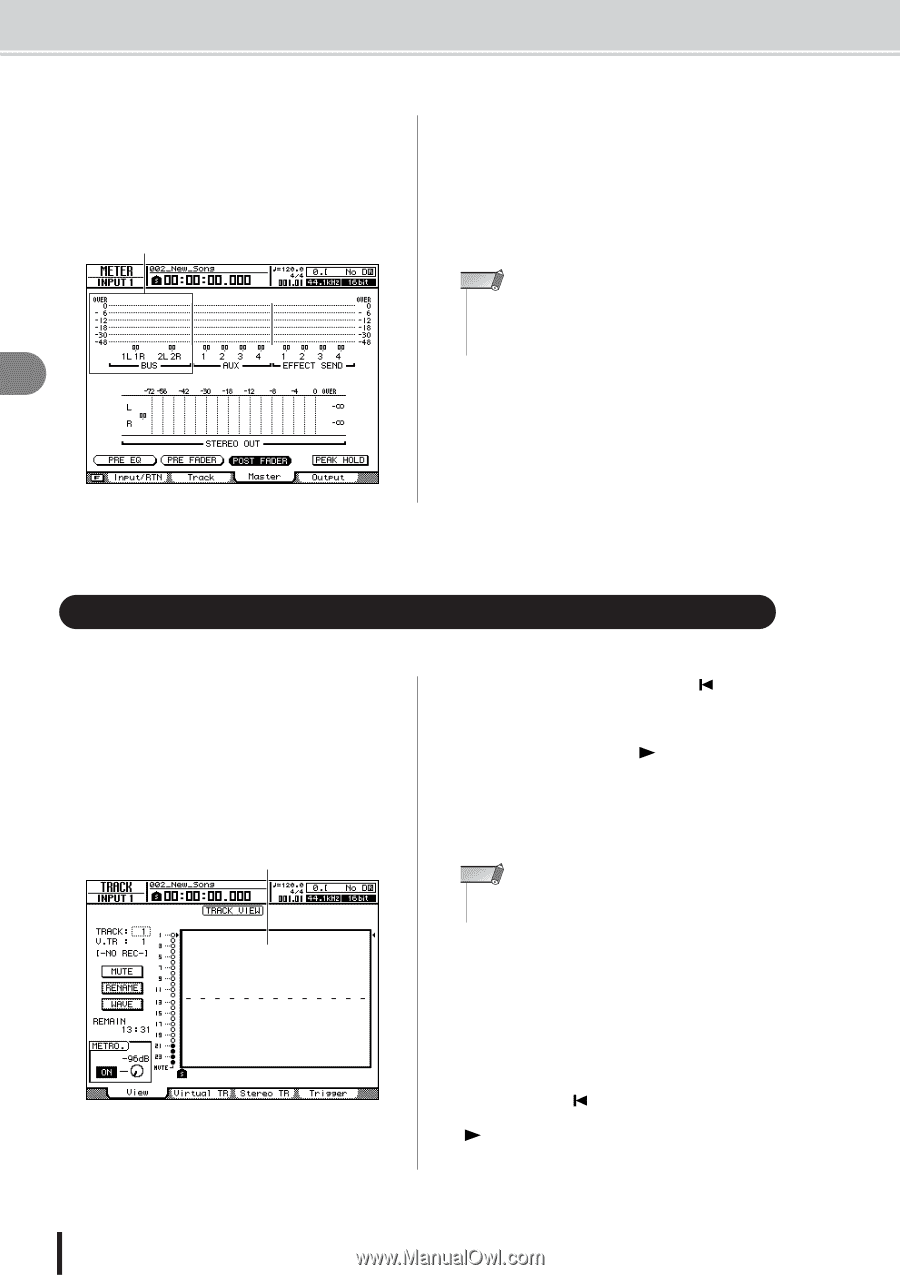
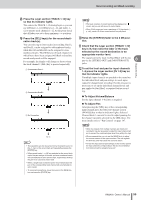
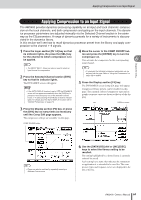
Direct recording and Mixed recording • Recording on a track 13 To monitor the signal levels sent from Bus1/Bus2 to the record-ready tracks press the [METER] key and then the [F3] key. This calls the METER screen Master page, allowing visual monitoring of the output levels from Bus1 and Bus2. Bus1 and Bus2 output level. 6 14 Move the cursor to the POST FADER button and press the [ENTER] key. The post-fader signal levels will be displayed. If the signal levels reach "OVER" on the meters press the Layer section [MASTER] key so that it lights to select the MASTER mixing layer, and use fader 1 (Bus1) and fader 2 (Bus2) to adjust the master levels for Bus1 and Bus2 as required. NOTE • If you switch the RECORD display page after doing the patch setup all your patch settings will be undone and lost (a confirmation popup window will appear). Remember to stay on the same RECORD page until recording is finished. Track recording Recording on a track Now that the necessary preparations have been completed, let's record on a track. 1 Call the TRACK screen View page by either pressing the Work Navigate section [TRACK] key as many times as necessary, or by pressing the [F1] key after pressing the [TRACK] key. This page can be used to confirm which tracks do and do not contain recorded data. You can also make any required metronome settings via this page (refer to page 62 for metronome instructions). Track view 2 Press the Transport section RTZ [ ] key to return to the beginning of the song. 3 Hold down the Transport section REC [●] key and press the PLAY [ ] key to start recording. Recording will begin on the track set up as the record destination. In the track view within the screen, the vertical line that indicates the current location will advance towards the right. NOTE • Recording will not begin if no track is in the record-ready mode. 4 To stop recording, press the STOP [■] key. The recorded audio data will appear in bar-graph form in the track view. The data entry/control section [UNDO/REDO] key will light. This indicates that you can press the [UNDO/REDO] key to execute the Undo function. 5 To hear the recording from the beginning, press the RTZ [ ] key to return the counter display to zero and press the PLAY [ ] key. 56 AW2400 Owner's Manual
-
 1
1 -
2
-
3
-
4
-
5
-
6
-
7
-
8
-
9
-
10
-
11
-
12
-
13
-
14
-
15
-
16
-
17
-
18
-
19
-
20
-
21
-
22
-
23
-
24
-
25
-
26
-
27
-
28
-
29
-
30
-
31
-
32
-
33
-
34
-
35
-
36
-
37
-
38
-
39
-
40
-
41
-
42
-
43
-
44
-
45
-
46
-
47
-
48
-
49
-
50
-
 51
51 -
 52
52 -
 53
53 -
 54
54 -
 55
55 -
 56
56 -
 57
57 -
 58
58 -
 59
59 -
 60
60 -
 61
61 -
62
-
63
-
64
-
65
-
66
-
67
-
68
-
69
-
70
-
71
-
72
-
73
-
74
-
75
-
76
-
77
-
78
-
79
-
80
-
81
-
82
-
83
-
84
-
85
-
86
-
87
-
88
-
89
-
90
-
91
-
92
-
93
-
94
-
95
-
96
-
97
-
98
-
99
-
100
-
101
-
102
-
103
-
104
-
105
-
106
-
107
-
108
-
109
-
110
-
111
-
112
-
113
-
114
-
115
-
116
-
117
-
118
-
119
-
120
-
121
-
122
-
123
-
124
-
125
-
126
-
127
-
128
-
129
-
130
-
131
-
132
-
133
-
134
-
135
-
136
-
137
-
138
-
139
-
140
-
141
-
142
-
143
-
144
-
145
-
146
-
147
-
148
-
149
-
150
-
151
-
152
-
153
-
154
-
155
-
156
-
157
-
158
-
159
-
160
-
161
-
162
-
163
-
164
-
165
-
166
-
167
-
168
-
169
-
170
-
171
-
172
-
173
-
174
-
175
-
176
-
177
-
178
-
179
-
180
-
181
-
182
-
183
-
184
-
185
-
186
-
187
-
188
-
189
-
190
-
191
-
192
-
193
-
194
-
195
-
196
-
197
-
198
-
199
-
200
-
201
-
202
-
203
-
204
-
205
-
206
-
207
-
208
-
209
-
210
-
211
-
212
-
213
-
214
-
215
-
216
-
217
-
218
-
219
-
220
-
221
-
222
-
223
-
224
-
225
-
226
-
227
-
228
-
229
-
230
-
231
-
232
-
233
-
234
-
235
-
236
-
237
-
238
-
239
-
240
-
241
-
242
-
243
-
244
-
245
-
246
-
247
-
248
-
249
-
250
-
251
-
252
-
253
-
254
-
255
-
256
-
257
-
258
-
259
-
260
-
261
-
262
-
263
-
264
-
265
-
266
-
267
-
268
-
269
-
270
-
271
-
272
-
273
-
274
-
275
-
276
-
277
-
278
-
279
-
280
-
281
-
282
-
283
-
284
-
285
-
286
-
287
-
288
 |
 |