Yamaha CDC-735 Owner's Manual - Page 4
Connections - cd
 |
View all Yamaha CDC-735 manuals
Add to My Manuals
Save this manual to your list of manuals |
Page 4 highlights
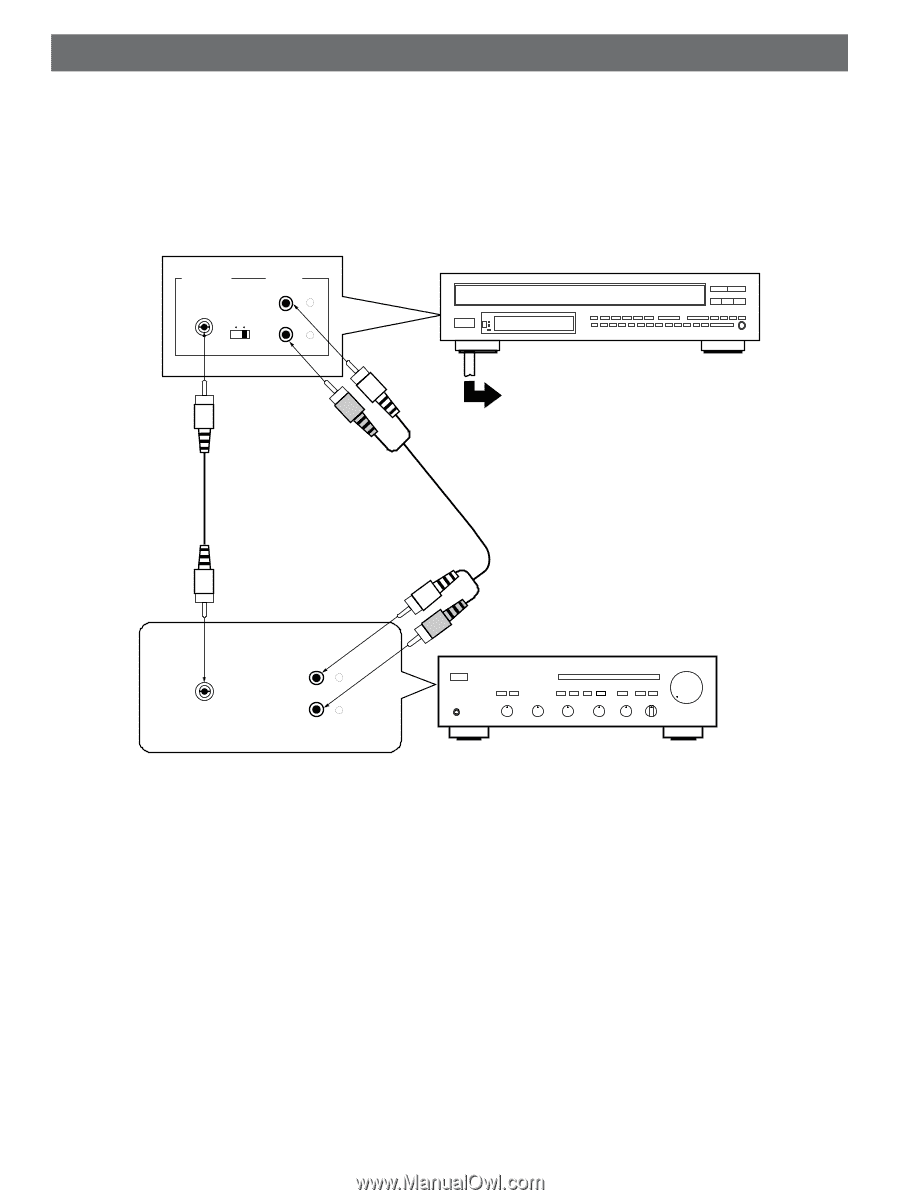
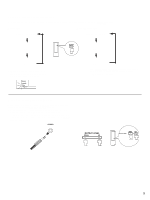
CONNECTIONS q Before making any connections, switch OFF the power to the unit and the amplifier or other component. q Connections should be made to the correct input terminals of the amplifier or other component. q If the placement of this unit causes noise to other equipment, such as a tuner, separate them from each other. q If you use the DIGITAL OUTPUT (COAXIAL) terminal for the connection, be sure to set the DIGITAL OUT ON/OFF switch on the rear of this unit to the "ON" position. Otherwise, this switch should be set to the "OFF" position. DIGITAL OUT COAXIAL LINE OUT L ON OFF R — Connection cord This unit To AC outlet – Connection cord (included) COAXIAL DIGITAL IN L R CD Amplifier Choose one of the ways listed below to connect this unit to your amplifier. When the LINE OUT (analog) terminals of this unit are used ( – ) q Be sure to set the DIGITAL OUT ON/OFF switch on the rear of this unit to the "OFF" position. q Be sure that the left ("L") and right ("R") LINE OUT terminals are connected to the corresponding (left and right) terminals of the amplifier or other component. q Connect the "LINE OUT" terminals to the "CD" (or "AUX") terminals of the amplifier. If the amplifier does not have such terminals, use the "TAPE PB" terminals. For additional details concerning these connections, refer to the operation instructions for the amplifier being used. q Adjust the level of signals output into an amplifier, etc. by using the OUTPUT LEVEL control. * Switching the DIGITAL OUT ON/OFF switch on the rear panel resets the adjusted LINE OUT (analog) output level to maximum. 4 When the DIGITAL OUT (COAXIAL) terminal of this unit is used ( — ) q Be sure to set the DIGITAL OUT ON/OFF switch on the rear of this unit to the "ON" position. q Make the connection from this terminal to the digital input terminal of an amplifier or D/A (digital-to-analog) converter by using a connection cord. q The level of signals output into an amplifier is fixed to max. and cannot be adjusted.
-
 1
1 -
 2
2 -
 3
3 -
 4
4 -
 5
5 -
 6
6 -
 7
7 -
 8
8 -
 9
9 -
 10
10 -
11
-
12
-
13
-
14
-
15
-
16
-
17
-
18
-
19
-
20
 |
 |