Yamaha CLP-170 Owner's Manual - Page 116
CLP-170: Keyboard Stand Assembly
 |
View all Yamaha CLP-170 manuals
Add to My Manuals
Save this manual to your list of manuals |
Page 116 highlights
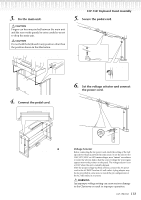
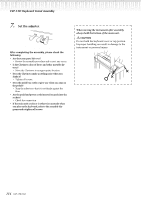
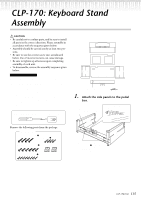
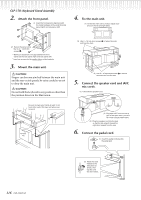
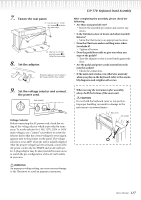
CLP-170: Keyboard Stand Assembly 2. Attach the front panel. (1) Insert the front panel in alignment with the metal hardware of the pedal box/side panel (right) and side panel (left). 4. Fix the main unit. (1) Center the main unit to produce equal clearance on the left and right sides. L R (2) Secure the panel using the six 4 × 14mm thin screws 3. * Make sure that there is no gap between the front panel and the side panel (right) and side panel (left) * Insert six screws into the smaller holes on the brackets. 3. Mount the main unit. CAUTION Fingers can become pinched between the main unit and the rear or side panels, be extra careful so as not to drop the main unit. CAUTION Do not hold the keyboard in any position other than the position shown in the illustration. (3) Use 6 × 16 mm short screws 2 to fasten the main unit from the front. (2) Use 6 × 16 mm short screws 2 to secure the main unit from the rear. 5. Connect the speaker cord and iAFC mic cords. (1) Unbundle the speaker cord. Be sure to place your hands at least 10 cm from either end of the main unit when positioning it. At least 10c (3) Plug each iAFC mic cord into a jack of the same color, and affix the cords using a plastic band. (2) Plug the speaker cord into the jack so that the tab extends toward the right when viewed from the rear. 6. Connect the pedal cord. (1) Insert the pedal cord plug into the pedal jack. (2) Attach the cord holders to the side panel as shown, then clip the cord into the holders. 116 CLP-170/150
-
 1
1 -
2
-
3
-
4
-
5
-
6
-
7
-
8
-
9
-
10
-
11
-
12
-
13
-
14
-
15
-
16
-
17
-
18
-
19
-
20
-
21
-
22
-
23
-
24
-
25
-
26
-
27
-
28
-
29
-
30
-
31
-
32
-
33
-
34
-
35
-
36
-
37
-
38
-
39
-
40
-
41
-
42
-
43
-
44
-
45
-
46
-
47
-
48
-
49
-
50
-
51
-
52
-
53
-
54
-
55
-
56
-
57
-
58
-
59
-
60
-
61
-
62
-
63
-
64
-
65
-
66
-
67
-
68
-
69
-
70
-
71
-
72
-
73
-
74
-
75
-
76
-
77
-
78
-
79
-
80
-
81
-
82
-
83
-
84
-
85
-
86
-
87
-
88
-
89
-
90
-
91
-
92
-
93
-
94
-
95
-
96
-
97
-
98
-
99
-
100
-
101
-
102
-
103
-
104
-
105
-
106
-
107
-
108
-
109
-
110
-
 111
111 -
 112
112 -
 113
113 -
 114
114 -
 115
115 -
 116
116 -
 117
117 -
 118
118 -
 119
119 -
 120
120 -
 121
121 -
122
-
123
-
124
 |
 |
