Yamaha CRW4260TX User Guide - Page 14
䌀栀愀瀀㈀⸀ 吀漀甀爀椀渀最 䄀爀漀甀渀搀, Rear Panel
 |
View all Yamaha CRW4260TX manuals
Add to My Manuals
Save this manual to your list of manuals |
Page 14 highlights
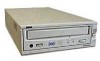
Chapter 2 - Touring Around CRW4260tx Chapter 2 - Touring Around CRW4260tx Rear Panel 5 AC I N SCSI-1 SCSI-2 CDR ID TERMINATOR 1 LINE OUT R L OFF ON 1 23 4 1 AC IN Connect the included power cable here. 2 CDR ID Use this switch to set a unique SCSI ID number for the CRW4260tx. 3 TERMINATOR This switch is used to set termination. Refer to the terminator setting section for details. 4 LINE OUT (L, R) These jacks are used to output audio to the amplifier. 5 SCSI-1, SCSI-2 These connectors are used to connect the CRW4260tx in the SCSI daisy chain. 6
-
 1
1 -
2
-
3
-
4
-
5
-
6
-
7
-
8
-
 9
9 -
 10
10 -
 11
11 -
 12
12 -
 13
13 -
 14
14 -
 15
15 -
 16
16 -
 17
17 -
 18
18 -
 19
19 -
20
-
21
-
22
-
23
-
24
 |
 |

Chapter 2 - Touring Around CRW4260tx
6
Chapter 2 - Touring Around CRW4260tx
Rear Panel
1
AC IN
Connect the included power cable here.
2
CDR ID
Use this switch to set a unique SCSI ID number for the CRW4260tx.
3
TERMINATOR
This switch is used to set termination. Refer to the terminator setting
section for details.
4
LINE OUT (L, R)
These jacks are used to output audio to the amplifier.
5
SCSI-1, SCSI-2
These connectors are used to connect the CRW4260tx in the SCSI
daisy chain.
4
1
2
3
AC
I N
1
SCSI-1
SCSI-2
LINE OUT
CDR ID
L
R
TERMINATOR
OFF
ON
5