Yamaha CRW4260TX User Guide - Page 15
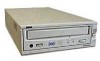
Front Panel, Disc tray, Headphone jack, Headphone volume control, ON/DISC LED, READ/WRITE LED
 |
View all Yamaha CRW4260TX manuals
Add to My Manuals
Save this manual to your list of manuals |
Page 15 highlights
Front Panel Chapter 2 - Touring Around CRW4260tx 1 6 78 POWER CRW4260tx 2 3 4 5 1 Disc tray The disc is inserted and ejected here. Pressing the eject button will open the tray. 2 Headphone jack This stereo mini jack allows you to connect headphones and listen to audio. 3 Headphone volume control This control adjusts the volume level of the headphone output. Rotating the control clockwise will increase the volume level. 4 ON/DISC LED This indicator lights up in orange when the CRW4260tx is powered on, and lights up in green when the CRW4260tx contains a disc. 5 READ/WRITE LED This indicator lights up in green when data is being read, and flashes when data is being accessed. It also lights up in orange when data is being recorded on a disc. 6 Manual Eject hole This is used to manually eject a disc that cannot be ejected in the normal way. It is for emergency use only. 7 Eject button This button is used to open or close the tray. 8 POWER switch This is the main power switch. Use it to power CRW4260tx on and off. CRW4260tx and any other devices connected to the SCSI chain must be powered on before the host computer is powered on. 7
-
 1
1 -
2
-
3
-
4
-
5
-
6
-
7
-
8
-
9
-
 10
10 -
 11
11 -
 12
12 -
 13
13 -
 14
14 -
 15
15 -
 16
16 -
 17
17 -
 18
18 -
 19
19 -
 20
20 -
21
-
22
-
23
-
24
 |
 |
