Yamaha CVP-601 Owner's Manual - Page 77
Music Finder – Calling Up Ideal Setups (Voice, Style, etc.) for Each Song
 |
View all Yamaha CVP-601 manuals
Add to My Manuals
Save this manual to your list of manuals |
Page 77 highlights
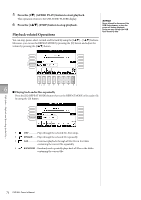
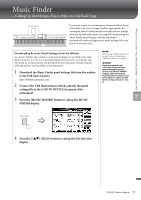
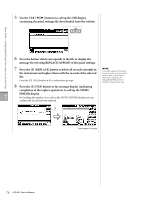
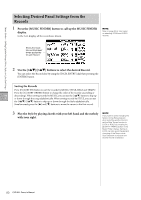
Music Finder - Calling Up Ideal Setups (Voice, Style, etc.) for Each Song - Music Finder - Calling Up Ideal Setups (Voice, Style, etc.) for Each Song - If you want to play in a certain genre of music but don't know which Style and Voice settings would be appropriate, the convenient Music Finder function can help you out. Simply select the desired music genre (or song title) from among the Music Finder panel settings, and the instrument automatically makes all appropriate panel settings to let you play in that music style. Downloading Records (Panel Settings) from the Website As a factory default, some sample records (panel settings) are provided in the Music Finder. However, in order to use the Music Finder function more conveniently and effectively, we recommend that you download the Records (panel settings) from the following website, then load them to this instrument. 1 Download the Music Finder panel settings file from the website to the USB flash memory. http://download.yamaha.com/ 2 Connect the USB flash memory which contains the panel settings file to the [USB TO DEVICE] terminal of the instrument. 3 Press the [MUSIC FINDER] button to call up the MUSIC FINDER display. NOTE Before using a USB flash memory, be sure to read "Connecting a USB flash memory" on page 91. NOTICE Replacing automatically overwrites all your records (panel settings/song data shown in the MUSIC FINDER display). Make sure that all important data has been saved to the USER or USB in the File Section display (shown in step 4). 7 4 Press the [7] (FILES) button to call up the File Selection display. CVP-601 Owner's Manual 77
-
 1
1 -
2
-
3
-
4
-
5
-
6
-
7
-
8
-
9
-
10
-
11
-
12
-
13
-
14
-
15
-
16
-
17
-
18
-
19
-
20
-
21
-
22
-
23
-
24
-
25
-
26
-
27
-
28
-
29
-
30
-
31
-
32
-
33
-
34
-
35
-
36
-
37
-
38
-
39
-
40
-
41
-
42
-
43
-
44
-
45
-
46
-
47
-
48
-
49
-
50
-
51
-
52
-
53
-
54
-
55
-
56
-
57
-
58
-
59
-
60
-
61
-
62
-
63
-
64
-
65
-
66
-
67
-
68
-
69
-
70
-
71
-
 72
72 -
 73
73 -
 74
74 -
 75
75 -
 76
76 -
 77
77 -
 78
78 -
 79
79 -
 80
80 -
 81
81 -
 82
82 -
83
-
84
-
85
-
86
-
87
-
88
-
89
-
90
-
91
-
92
-
93
-
94
-
95
-
96
-
97
-
98
-
99
-
100
-
101
-
102
-
103
-
104
-
105
-
106
-
107
-
108
-
109
-
110
-
111
-
112
-
113
-
114
-
115
-
116
-
117
 |
 |
