Yamaha CVP-92 Owner's Manual - Page 136
Utility, Micro Tuning (MICRO TUNING) Display —
 |
View all Yamaha CVP-92 manuals
Add to My Manuals
Save this manual to your list of manuals |
Page 136 highlights
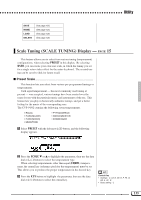
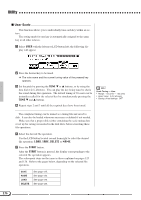
Utility Micro Tuning (MICRO TUNING) Display - PAGE 14 The Micro Tuning Feature makes it possible to individually tune each key of the keyboard. The created tuning can be saved to a disk and loaded whenever necessary. The set tuning can be turned on or off at anytime by using the left-most LCD button in this display. ZSelect the desired key Press any desired key to be tuned. ➔ The note name and the current tuning value of the pressed key will appear in the display. XSet the tuning...Press the TUNE M or L buttons or use the data dial or [-/+] to tune the pitch of the selected key. If you set the parameter at the left-most LCD button to ON, you can play the key being tuned in order to check the sound during this operation. The normal tuning of ±0 cents for the selected key can be instantly recalled by simultaneously pressing both the TUNE M or L buttons. CRepeat steps 1 and 2 Repeat steps 1 and 2 until all the required keys have been tuned...The completed tuning can be named as a tuning file and saved to disk. It can also be loaded whenever necessary or deleted if not needed. Make sure that a proper disk (either containing the micro tuning data or set up for saving) is inserted in the disk drive before executing these file operations. ZSelect the desired file operation Use the LCD button located second from right to select the desired file operation: LOAD, SAVE, DELETE or NAME. XPress the START button After the START button is pressed, the display corresponding to the selected file operation appears. The subsequent steps are the same as those explained on pages 125 and 126. Refer to the pages below, depending on the selected file operation. 134 • Range: -100 cents (- 1 semitone) - +100 cents (+ 1 semitone) • Basic Value: 0 (for all keys) • Backup of last settings: OFF
-
 1
1 -
2
-
3
-
4
-
5
-
6
-
7
-
8
-
9
-
10
-
11
-
12
-
13
-
14
-
15
-
16
-
17
-
18
-
19
-
20
-
21
-
22
-
23
-
24
-
25
-
26
-
27
-
28
-
29
-
30
-
31
-
32
-
33
-
34
-
35
-
36
-
37
-
38
-
39
-
40
-
41
-
42
-
43
-
44
-
45
-
46
-
47
-
48
-
49
-
50
-
51
-
52
-
53
-
54
-
55
-
56
-
57
-
58
-
59
-
60
-
61
-
62
-
63
-
64
-
65
-
66
-
67
-
68
-
69
-
70
-
71
-
72
-
73
-
74
-
75
-
76
-
77
-
78
-
79
-
80
-
81
-
82
-
83
-
84
-
85
-
86
-
87
-
88
-
89
-
90
-
91
-
92
-
93
-
94
-
95
-
96
-
97
-
98
-
99
-
100
-
101
-
102
-
103
-
104
-
105
-
106
-
107
-
108
-
109
-
110
-
111
-
112
-
113
-
114
-
115
-
116
-
117
-
118
-
119
-
120
-
121
-
122
-
123
-
124
-
125
-
126
-
127
-
128
-
129
-
130
-
 131
131 -
 132
132 -
 133
133 -
 134
134 -
 135
135 -
 136
136 -
 137
137 -
 138
138 -
 139
139 -
 140
140 -
 141
141 -
142
-
143
-
144
-
145
-
146
-
147
-
148
 |
 |
