Yamaha DJX-II Owner's Manual - Page 73
Saving and Loading the Sequence Data, About the User Pattern Data
 |
View all Yamaha DJX-II manuals
Add to My Manuals
Save this manual to your list of manuals |
Page 73 highlights
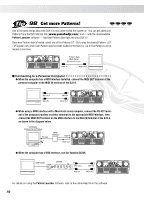
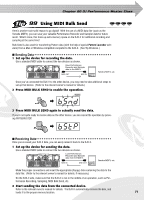
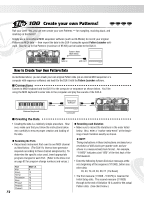
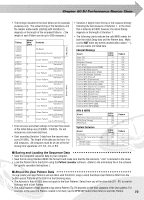
Chapter 20 DJ Performance Master Class • The timings indicated in the chart below are for example purposes only. The actual timing of the Variations and the marker meta-events (starting with Variation 2) depends on the length of the recorded Patterns. (The length of each Pattern can be up to 256 measures.) Initial Setup Timing 1|1|000 1|1|000 1|2|000 : 1|4|479 2|1|000 : 3|4|479 4|1|000 : 4|4|479 5|1|000 : 5|4|479 6|1|000 : 7|4|479 8|1|000 : 9|4|479 10|1|000 : 11|4|479 12|1|000 : 12|4|479 13|1|000 : 13|4|479 14|1|000 : 15|4|479 16|1|000 : 17|4|479 Marker Meta- Contents Event TG Reset Initial Setup Events 1 Variation 1 2 bars Pattern (up to 256 bars) 2 Variation 2 1 bar Pattern (up to 256 bars) 3 Variation 3 1 bar Pattern (up to 256 bars) 4 Variation 4 2 bars Pattern (up to 256 bars) 5 Variation 5 2 bars Pattern (up to 256 bars) 6 Variation 6 2 bars Pattern (up to 256 bars) 7 Variation 7 1 bar Pattern (up to 256 bars) 8 Variation 8 1 bar Pattern (up to 256 bars) 9 Variation 9 2 bars Pattern (up to 256 bars) 10 Variation 10 2 bars Pattern (up to 256 bars) Source Pattern • Enter all voice and effect settings in the last three beats of the Initial Setup area (1|2|000 - 1|4|479). Do not include any note event data here. • Start recording Variation 1 data from the second measure (2|1|000). The length of the data can be from 1 to 256 measures. All measures must be of one of the following time signatures: 2/4, 3/4, 4/4, or 5/4. • Variation 2 begins from the top of the measure directly following the last measure of Variation 1. In the chart, this is listed as 4|1|000; however, the actual timing depends on the length of Variation 1. • The following charts indicate the valid MIDI events for both the Initial Setup data and the Pattern data. Make sure to NOT enter any events marked with a dash (-), nor any events not listed here. Channel Message Event Note Off Note On Program Change Pitch Bend Control #0 (Bank Select MSB) Control #1 (Modulation) Control #6 (Data Entry MSB) Control #7 (Master Volume) Control #10 (Panpot) Control #11 (Expression) Control #32 (Bank Select LSB) Control #38 (Data Entry LSB) Control #71 (Harmonic Content) Control #72 (Release Time) Control #73 (Attack Time) Control #74 (Brightness) Control #84 (Portamento Control) Control #91 (Reverb Send Level) Control #93 (Chorus Send Level) Control #100 (RPN LSB) Control #101 (RPN MSB) Initial Setup - - OK OK OK OK OK OK OK OK OK OK OK OK OK OK - OK OK OK OK Pattern OK OK OK OK OK OK - OK OK OK OK - OK - - OK OK OK OK - - RPN & NRPN Event RPN (Pitch Bend Sensitivity) RPN (Fine Tuning) RPN (Null) Initial Setup OK OK OK Pattern - - - System Exclusive Event TG Reset Sys Ex XG Parameter Change (Effect1) Reverb Type Chorus Type Initial Setup OK OK OK OK Pattern - - - - I Saving and Loading the Sequence Data • Save the completed sequence data to your computer. • Save the file using Standard MIDI File Format 0 and make sure that the file extension ".mid" is included in the name. • Load the Pattern file to the DJX-II using the Pattern Launcher software. (Refer to the online Help file in the software for specific operation instructions.) I About the User Pattern Data As you create your own Patterns and use them with the DJX-II, keep in mind that these User Patterns differ from the built-in preset Patterns of the DJX-II in the following ways: • The Activator's Auto kit (00) does not apply to the User Patterns. Select from any of the other kits (01 - 51) to use the Activator with a User Pattern. • The actual number of taps needed to tap start a Pattern (Tip 79) depends on the time signature of the User pattern. For example, in the case of a Pattern created in 3/4 beet, tap the BPM/TAP button three times to start the Pattern. 73
-
 1
1 -
2
-
3
-
4
-
5
-
6
-
7
-
8
-
9
-
10
-
11
-
12
-
13
-
14
-
15
-
16
-
17
-
18
-
19
-
20
-
21
-
22
-
23
-
24
-
25
-
26
-
27
-
28
-
29
-
30
-
31
-
32
-
33
-
34
-
35
-
36
-
37
-
38
-
39
-
40
-
41
-
42
-
43
-
44
-
45
-
46
-
47
-
48
-
49
-
50
-
51
-
52
-
53
-
54
-
55
-
56
-
57
-
58
-
59
-
60
-
61
-
62
-
63
-
64
-
65
-
66
-
67
-
 68
68 -
 69
69 -
 70
70 -
 71
71 -
 72
72 -
 73
73 -
 74
74 -
 75
75 -
 76
76 -
 77
77 -
 78
78 -
79
-
80
-
81
-
82
-
83
-
84
-
85
-
86
-
87
-
88
-
89
-
90
-
91
-
92
-
93
-
94
-
95
-
96
-
97
-
98
-
99
-
100
 |
 |