Yamaha DVD-CX1 Owners Manual - Page 34
Troubleshooting
 |
View all Yamaha DVD-CX1 manuals
Add to My Manuals
Save this manual to your list of manuals |
Page 34 highlights
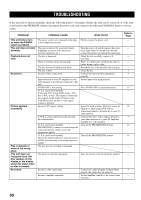
APPENDIX TROUBLESHOOTING If this unit fails to operate normally, check the following points to determine whether the fault can be corrected, or if the fault is not listed in the PROBLEM column, disconnect the power code and contact your authorized YAMAHA dealer or service center. PROBLEM POSSIBLE CAUSE WHAT TO DO Refer to Page This unit fails to turn The power cord is not connected or the plug Firmly connect the power cord. - on when the POWER is not completely inserted. switch is pressed. This unit does not work This unit is affected by an external shock Turn the power off and disconnect the power - normally. (lightning, excessive static electricity, cord. After about 30 seconds have passed, incorrect operation, etc.) connect the power and operate the unit again. Playback does not start. The disc is damaged. Check the disc carefully; replace it if - necessary. There is moisture on the laser pickup. Wait 1 to 2 hours after switching the unit on - before trying to play a disc. The disc has been loaded upside down. Reload the disc with the label side facing up. - The disc is dirty. Clean the disc. 3 No picture. Incorrect video connections. Connect this unit and other equipment 9 properly. Input selection at your AV amplifier or your Set the input to the right position. - video monitor is not the one connected to this unit. VIDEO OFF is functioning. Press VIDEO OFF to cancel the feature. 15 (U.S.A. and Canada models) - If you play PAL system DVD-Audio, 'This disc is PAL system. The output is sound only' may appear on the monitor. Picture is not available because the disc's video signal system is different. Picture appears incorrectly. Incorrect 'TV aspect' setting. Select the right position. However, it may be 26 difficult to adjust many DVD-Videos' widescreen format to fit perfectly in your 4:3 video monitor. A VCR is connected between this unit and Connect this unit's video outputs directly to 9 the video monitor. your video monitor or to your AV amplifier and then to a video monitor. (U.S.A. and Canada models) Turn off the PROGRESSIVE feature. 14 PROGRESSIVE is turned on even though the connected monitor cannot receive the progressive signals. (U.S.A. and Canada models) Turn off the PROGRESSIVE feature. 14 Due to the editing method or material used on a DVD, ghosting may occur with progressive output. Play is delayed, or The disc may be scratched or damaged. - starts at the wrong place. This unit does not recognize discs ('No disc' appears on the display, or the display shows the status when no disc is loaded). The disc(s) is not placed properly. Place the disc(s) correctly along the guide(s). - No sound. Incorrect cable connections. Connect the cables properly. If the problem 8 persists, the cables may be defective. Incorrect amplifier operation. Set the amplifier controls to the correct input - selection. 30
-
 1
1 -
2
-
3
-
4
-
5
-
6
-
7
-
8
-
9
-
10
-
11
-
12
-
13
-
14
-
15
-
16
-
17
-
18
-
19
-
20
-
21
-
22
-
23
-
24
-
25
-
26
-
27
-
28
-
 29
29 -
 30
30 -
 31
31 -
 32
32 -
 33
33 -
 34
34 -
 35
35 -
 36
36
 |
 |
