Yamaha DVD-S520 Owner's Manual - Page 16
Special DVD Features, FTS-Video, Checking the contents of DVD Video discs, Menus, Title/Disc menu
 |
View all Yamaha DVD-S520 manuals
Add to My Manuals
Save this manual to your list of manuals |
Page 16 highlights
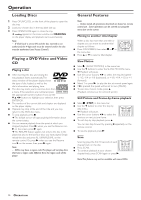
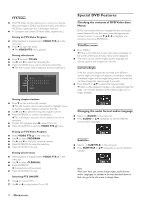
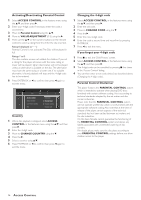
FTS-Video ¶ The FTS-Video function allows you to store your favorite titles and chapters (DVD) and favorite tracks and indexes (VCD) for a particular disc in the player memory. ¶ FTS program can contain 20 items (titles, chapters etc.). Storing an FTS-Video Program ¶ While playback is stopped, select VIDEO FTS c in the menu bar. ¶ Press 4 to open the menu. ➜ The VIDEO FTS menu appears. Storing titles/tracks ¶ Press 4 to select TITLES. ¶ Use 2 and 1 to select the required title. ¶ Press ENTER/OK if you wish to store the entire title. ➜ The title number will be added to the list of selections. FTS Title Chapter Program Favorite Track Selection On Off 1 2 3 4 5 6 7 8 9> 1 2 3 4 5 6 7 8 9> 13 Clear all Storing chapters/indexes ¶ Press 4 on the selected title number. ➜ The title number will be marked and the highlight moves to the first available chapter number for this title. ¶ Use 2 and 1 to select the required chapter number. ¶ Press ENTER/OK to confirm the selection. ➜ The title/chapter selection will be added to the list of selections. ¶ To start FTS playback, press B when FTS is On. ¶ Press ON SCREEN to exit the VIDEO FTS c menu. Erasing an FTS-Video Program ¶ Select VIDEO FTS c in the menu bar. ¶ Use 4 to select PROGRAM. ¶ Use 2 and 1 to select the required number. ¶ Press ENTER/OK to erase the selection. ¶ Press ON SCREEN to exit. Erasing all selections ¶ While playback is stopped, select VIDEO FTS c in the menu bar. ¶ Use 4 to select CLEAR ALL. ¶ Press ENTER/OK. ➜ All selections will be erased. ¶ Press ON SCREEN to exit. Switching FTS ON/OFF 1 Use 3 to move to FTS. 2 Use 2 or 1 to select either On or Off. Special DVD Features Checking the contents of DVD Video discs: Menus DVDs may contain menus to navigate the disc and access special features.To use the menu, press the appropriate numeric button or use the 4, 3, 2, 1 to highlight your selection, then press ENTER/OK. Title/Disc menu ¶ Press MENU. ➜ If the current title has a menu, the menu will appear on the screen. Otherwise, the disc menu will be displayed. ¶ The menu can list camera angles, spoken language and subtitle options, and chapters for the title. Camera Angle If the disc contains sequences recorded from different camera angles, the angle icon appears, showing the number of available angles and the angle being shown currently.You can then change the camera angle if you wish. ¶ Press ANGLE or 3/4 to select the required angle. ➜ After a while, playback changes to the selected angle.The angle icon remains displayed until multiple angles are no longer available. Changing the audio format and/or language ¶ Select Y (AUDIO) in the menu bar. ¶ Press AUDIO or 3/4 repeatedly to see the different format and/or languages. Subtitles ¶ Select Z (SUBTITLE) in the menu bar. ¶ Press SUBTITLE or 3/4 repeatedly to see the different subtitles. Note: With some discs, you cannot change angles, audio formats and/or Languages, or subtitles in the way described above. In that case, go to the disc menu to change them. 12 OPERATION
-
 1
1 -
2
-
3
-
4
-
5
-
6
-
7
-
8
-
9
-
10
-
 11
11 -
 12
12 -
 13
13 -
 14
14 -
 15
15 -
 16
16 -
 17
17 -
 18
18 -
 19
19 -
 20
20 -
 21
21 -
22
-
23
 |
 |