Yamaha EF2000iS Owners Manual - Page 36
Turn the fuel tank cap air vent knob to, Install the cover and tighten the screws.
 |
View all Yamaha EF2000iS manuals
Add to My Manuals
Save this manual to your list of manuals |
Page 36 highlights
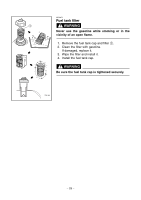
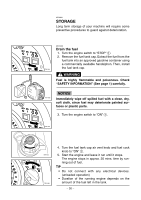
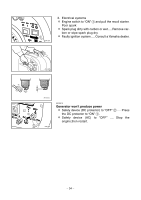
6. Remove the screws 1, and then remove the cover 2. 1 2 7DK-030 3 7DK-071 7. Drain the fuel from the carburetor by loosening the drain screw 3 on the carburetor float chamber. 8. Turn the engine switch to "OFF". 9. Turn the fuel cock knob to "OFF". 10. Tighten the drain screw 3. 11. Install the cover and tighten the screws. 12. Turn the fuel tank cap air vent knob to "OFF". 13. Tighten further if any screws, bolts and nuts are loose. 14. Store the generator in a dry, well-ventilated place, with the cover placed over it. - 31 -
-
 1
1 -
2
-
3
-
4
-
5
-
6
-
7
-
8
-
9
-
10
-
11
-
12
-
13
-
14
-
15
-
16
-
17
-
18
-
19
-
20
-
21
-
22
-
23
-
24
-
25
-
26
-
27
-
28
-
29
-
30
-
 31
31 -
 32
32 -
 33
33 -
 34
34 -
 35
35 -
 36
36 -
 37
37 -
 38
38 -
 39
39 -
 40
40 -
 41
41 -
42
-
43
-
44
-
45
-
46
-
47
-
48
 |
 |

–
31
–
6.
Remove the screws
1
, and then remove the cover
2
.
7.
Drain the fuel from the carburetor by loosening the
drain screw
3
on the carburetor float chamber.
8.
Turn the engine switch to
“
OFF
”
.
9.
Turn the fuel cock knob to
“
OFF
”
.
10.
Tighten the drain screw
3
.
11.
Install the cover and tighten the screws.
12.
Turn the fuel tank cap air vent knob to
“
OFF
”
.
1
2
7DK-030
3
7DK-071
13. Tighten further if any screws, bolts and nuts are
loose.
14.
Store the generator in a dry, well-ventilated place,
with the cover placed over it.