Yamaha ELS-01 Owner's Manual - Page 11
Quick Introductory Guide, Getting Started - electone
 |
View all Yamaha ELS-01 manuals
Add to My Manuals
Save this manual to your list of manuals |
Page 11 highlights
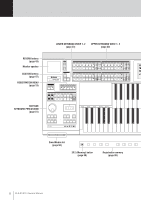
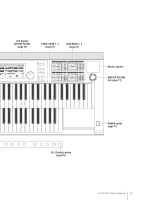
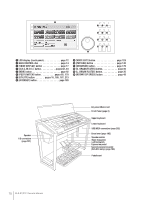
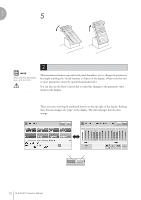
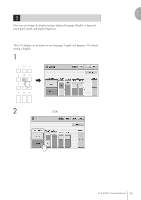
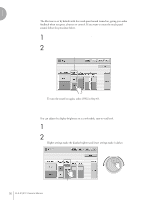
1 Quick Introductory Guide Whether you are an advanced performer or have never touched an electronic keyboard in your life, we recommend that you take the time to go through this basic section. It shows you in the simplest possible manner how to start playing your Electone. Contents 1 Getting Started 11 2 Using the LCD Display 12 • Changing the Display Page 12 • Pressing Buttons on the Display 13 • Adjusting Parameter Values by Using the Display Sliders 14 3 LCD Display Settings 15 • Selecting the Display Language 15 • Muting the Touch Panel Sound 16 • Adjusting the Display Brightness 16 4 Voice Display 17 5 Registration Menu 19 • Selecting Registrations from the Registration Menu 19 • Registration Menu List 20 6 Confirming the Version of Your Electone 21 7 Factory Set (Initializing the Electone 21 1 Getting Started 1 Plug the power cord into an appropriate electrical outlet. Only use the voltage specified as correct for the Electone. The required voltage is printed on the name plate of the Electone. Yamaha products are manufactured specifically for the supply voltage in the area where they are to be sold. If you intend to use the instrument in another location, or if any doubt exists about the supply voltage, please consult with a qualified technician. 2 Make sure that the POWER switch of the speaker is set to on. If you are using the ELS-01C, also set the REAR SPEAKER switch to on (not available on the ELS-01). 3 Turn on the Electone by pressing the POWER switch. POWER NOTE When using the rear speaker, place the Electone against a wall, allowing about 20 cm from the wall for optimum sound. 4 Set the MASTER VOLUME control. The MASTER VOLUME control is an overall control that affects the volume of NOTE the entire instrument. You do not need to switch the power of the speaker on/off whenever you use the instrument. Decreasing the volume Increasing the volume If you want, you can always keep it on and turn off the power by pressing the main POWER switch of the instrument. MASTER VOLUME ELS-01/01C Owner's Manual 11
-
 1
1 -
2
-
3
-
4
-
5
-
 6
6 -
 7
7 -
 8
8 -
 9
9 -
 10
10 -
 11
11 -
 12
12 -
 13
13 -
 14
14 -
 15
15 -
 16
16 -
17
-
18
-
19
-
20
-
21
-
22
-
23
-
24
-
25
-
26
-
27
-
28
-
29
-
30
-
31
-
32
-
33
-
34
-
35
-
36
-
37
-
38
-
39
-
40
-
41
-
42
-
43
-
44
-
45
-
46
-
47
-
48
-
49
-
50
-
51
-
52
-
53
-
54
-
55
-
56
-
57
-
58
-
59
-
60
-
61
-
62
-
63
-
64
-
65
-
66
-
67
-
68
-
69
-
70
-
71
-
72
-
73
-
74
-
75
-
76
-
77
-
78
-
79
-
80
-
81
-
82
-
83
-
84
-
85
-
86
-
87
-
88
-
89
-
90
-
91
-
92
-
93
-
94
-
95
-
96
-
97
-
98
-
99
-
100
-
101
-
102
-
103
-
104
-
105
-
106
-
107
-
108
-
109
-
110
-
111
-
112
-
113
-
114
-
115
-
116
-
117
-
118
-
119
-
120
-
121
-
122
-
123
-
124
-
125
-
126
-
127
-
128
-
129
-
130
-
131
-
132
-
133
-
134
-
135
-
136
-
137
-
138
-
139
-
140
-
141
-
142
-
143
-
144
-
145
-
146
-
147
-
148
-
149
-
150
-
151
-
152
-
153
-
154
-
155
-
156
-
157
-
158
-
159
-
160
-
161
-
162
-
163
-
164
-
165
-
166
-
167
-
168
-
169
-
170
-
171
-
172
-
173
-
174
-
175
-
176
-
177
-
178
-
179
-
180
-
181
-
182
-
183
-
184
-
185
-
186
-
187
-
188
-
189
-
190
-
191
-
192
-
193
-
194
-
195
-
196
-
197
-
198
-
199
-
200
-
201
-
202
-
203
-
204
-
205
-
206
-
207
-
208
-
209
-
210
-
211
-
212
-
213
-
214
-
215
-
216
-
217
-
218
-
219
-
220
-
221
-
222
-
223
-
224
-
225
-
226
-
227
-
228
-
229
-
230
-
231
-
232
-
233
-
234
-
235
-
236
-
237
-
238
-
239
-
240
 |
 |