Yamaha M7CL M7cl V3 Editor Owner's Manual (v3.0.x) - Page 2
Getting Started, Overview of M7CL V3 Editor, Configuring M7CL Editor - mixing console
 |
View all Yamaha M7CL manuals
Add to My Manuals
Save this manual to your list of manuals |
Page 2 highlights
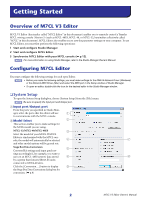
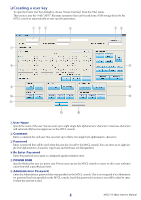
Getting Started Overview of M7CL V3 Editor M7CL V3 Editor (hereinafter called "M7CL Editor" in this document) enables you to remotely control a Yamaha M7CL mixing console (Version 3) (such as M7CL-48ES, M7CL-48, or M7CL-32; hereinafter collectively called "M7CL" in this document). M7CL Editor also enables you to save the parameter settings on your computer. To use M7CL Editor, you must first perform the following operations: 1 Start and configure Studio Manager. 2 Start and configure M7CL Editor. 3 Synchronize M7CL Editor with your M7CL console (➥ p.12). NOTE For more information on using Studio Manager, refer to the Studio Manager Owner's Manual. Configuring M7CL Editor You must configure the following settings for each open Editor. NOTE • Before you make the following settings, you must make settings for the DME-N Network Driver (Windows) or the Network-MIDI Driver (Mac) and select the MIDI port in the Setup window of Studio Manager. • To open an editor, double-click the icon for the desired editor in the Studio Manager window. ❏ System Setup To open the System Setup dialogbox, choose [System Setup] from the [File] menu. NOTE Be sure to specify the Input port and Output port. A Input port/Output port From the ports you specified in Studio Man- ager, select the ports that the editor will use 1 to communicate with the M7CL console. B Model Select 2 This section enables you to make settings for the M7CL model you are using. M7CL-32/M7CL-48/M7CL-48ES 3 Select the model of your M7CL. If M7CL Editor is synchronized with the M7CL console, the model will automatically be selected 4 7 and other model options will be grayed out. Stage Box Data Conversion 5 Converts HA settings and input patch set- tings accordingly if, for example, you want to use (on an M7CL-48ES system) data stored 6 8 by a system that features SB168-ES units connected to M7CL-48 slots. Click the [Conversion...] button to display 9 the Stage Box Data Conversion dialog box for conversion. (➥ p.8) 2 M7CL V3 Editor Owner's Manual
-
 1
1 -
 2
2 -
 3
3 -
 4
4 -
 5
5 -
 6
6 -
 7
7 -
 8
8 -
9
-
10
-
11
-
12
-
13
-
14
-
15
-
16
-
17
-
18
-
19
-
20
-
21
-
22
-
23
-
24
-
25
-
26
-
27
-
28
-
29
-
30
-
31
-
32
-
33
-
34
-
35
-
36
-
37
-
38
-
39
-
40
-
41
-
42
-
43
-
44
-
45
-
46
-
47
-
48
-
49
-
50
-
51
-
52
-
53
-
54
-
55
-
56
-
57
-
58
-
59
-
60
-
61
-
62
-
63
-
64
-
65
-
66
-
67
-
68
-
69
-
70
-
71
-
72
-
73
-
74
-
75
-
76
-
77
-
78
-
79
-
80
 |
 |
