Yamaha P-520 P-520 OWNERS MANUAL - Page 10
Playing, Records
 |
View all Yamaha P-520 manuals
Add to My Manuals
Save this manual to your list of manuals |
Page 10 highlights
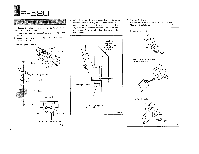
P-520 PLAYING RECORDS After you have assembled the turntable, made the necessary adjustments and connected the turntable to the audio amplifier, you are ready to start playing records. Proceed as follows. Please check the connecting cords for the turntable, amp and speakers. • F'ower cord -*AC outlet or amplifier's power outlet • Output cords -9- Phono terminals on the amp • If you are using the ground wire, check to see that it is securely fastened to the amplifier's GND terminal. 2 Setting the Turntable into Operation • Turn the amp's power switch on, and set the input selector to Phono. Set the amp's volume level accordingly. 3 Place your selected record on the turntable platter and set the record size selector switch to the size of the record. • When playing 45 rpm singles, slip the accessory 45 adaptor over the center shaft. When playing 33-1/3 rpm records use the adaptor as a record clamp. 4 Set the SPEED switch so that it corresponds to the rated speed of the record. 5 Make sure that the cueing switch is in the DOWN "s." position. 6 Remove the stylus cover. 7 Remove the arm rest lock and depress the PLAY switch. Record play will start automatically. Record play • Adjust the amplifier's volume and tone controls to your own preferred levels. 9 Once record play has been completed, the tonearm will automatically rise and return to the arm rest and the platter will stop rotating. o Depress the CUT switch if you want to stop record play. • Operate the cueing switch (refer to page 8) if you you want to interrupt record play. • If the REPEAT switch has been activated, the unit wil l indefinitely repeat the same side of the record. Even if the CUT switch is depressed, play will resume again. 9
-
 1
1 -
2
-
3
-
4
-
 5
5 -
 6
6 -
 7
7 -
 8
8 -
 9
9 -
 10
10 -
 11
11 -
 12
12
 |
 |
