Yamaha P-520 P-520 OWNERS MANUAL - Page 7
Mounting, Headshell
 |
View all Yamaha P-520 manuals
Add to My Manuals
Save this manual to your list of manuals |
Page 7 highlights
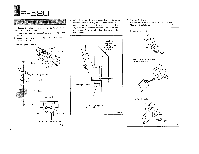
MOUNTING THE HEADSHELL To mount the headShell, loosen the headshell locking screw and insert the headshell with the phono cartridge in place. Next securely tighten the locking screw. Be sure to keep the headshell straight when inserting it into the tonearm as it is very easy to damage the four contact pins inside the headshell. Mounting the headshell Push the headshell straight into the tonearm Loosen 7.) Tighten Locking screw i. Tonearm Headshell Cartridge - Fig. 4 P-520 ikOiLiSTING TONEARM EALANCE Proceed with the balance adjustment after mounting and installing the main weight assembly. Disconnect the power supply to prevent turntable rotation. Also, be sure to set the ANTI-SKATING control to "OFF". 1. Set the cueing switch to the DOWN " BL " position and depress the arm lifter. 2. First release the arm lock. Then bring the tonearm away from the arm rest. 3. Carefully release the finger hook and check to see if the tonearm is horizontally balanced. 4. Adjust the main weight until the tonearm is in a perfectly horizontal position. 5. Once the tonearm has been balanced, return it to the arm rest. Balance adjustment Headshell is too heavy (rotate the Balance adjustment knob in the direction of the arrow) x 4111111111 Arm lifter Tonearm is balanced perfectly Headshel Tonearm Balance adjustment knob 0 Tonearm Cartridge Rear assembly is too heavy (rotate the Balance adjustment knob in the direction of the arrow) IN Fig. 5 Fig. 6 6
-
 1
1 -
 2
2 -
 3
3 -
 4
4 -
 5
5 -
 6
6 -
 7
7 -
 8
8 -
 9
9 -
 10
10 -
 11
11 -
 12
12
 |
 |
