Yamaha P-520 P-520 OWNERS MANUAL - Page 9
Adjusting, Plattef, Speed, Connections, Ampliner
 |
View all Yamaha P-520 manuals
Add to My Manuals
Save this manual to your list of manuals |
Page 9 highlights
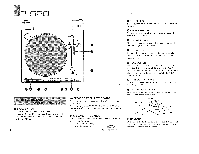
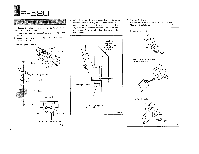
ADJUSTING PLATTEF: SPEED CONNECTIONS TO YOUR AMPLINER Observe the stroboscope, and adjust the speed control knob at the bottom of the cabinet so that the stripe matching the power line frequency in your area appears to stand still. The speed control knob permits an adjustment of up to ±3.0% in speed. a In some cases the stroboscope stripe will appear to move slightly. This is caused by small fluctuations in the power line voltage and does not mean that something is wrong with the turntable. Adjusting platter speed Cabinet 1. Connect the output cords from the rear-panel of the cabinet to the PHONO terminals on the audio amplifier. Make sure that the left and right channels are properly matched. The white cord signifies left (L) channel and the red the right (R) channel. 2. Connect the black ground wire to the GROUND (GND) terminal on the audio amplifier. Depending on the amplifier, better sound is sometimes obtained by not connecting the ground wire. 3. Connect the power plug to the AC wall outlet or to an auxiliary outlet on the audio amplifier. Connections to your amplifier PHONO terminals P-520 THE CLIUNG SWITCH n normal operation the cueing switch is set in the DOWN position. However, if you wish to interrupt record play in order to play a different track, the cueing switch can be used to gently raise and lower the stylus. 1. Raising the stylus: Set the cueing switch to the UP " " position. The stylus will immediately rise from the record. 2. Lowering the stylus: Set the cueing switch to the DOWN " AL " position. The stylus will now descend onto the record and play will begin. Using the cueing switch UP White is for left (L) channel Speed control knob When the strobo markings are: Stroboscope 11111111I1ll1lf1l11111110!i Moving to the left = speed is fast. Turn the speed control knob to the right Stationary = speed is correct. Milli Till! MIMI Moving to the right = speed is slow. Turn the speed control knob to the Left Fig. 10 kts Red is for right (R) channel Ground wire DOWN 4ee5ss , gga76-ji UP position Fig. 11 00 DOWN "JOL" position Fig. 12 8
-
 1
1 -
2
-
3
-
 4
4 -
 5
5 -
 6
6 -
 7
7 -
 8
8 -
 9
9 -
 10
10 -
 11
11 -
 12
12
 |
 |
